As an Amazon Associate KitchenwareSets.com earns from qualifying purchases.
9 Easy Recipes for Good Looking Food That Impress
Have you ever scrolled through Pinterest, mesmerized by a dish that looks like a work of art, and thought, “I could never make that”? It’s a common feeling. We all want to create impressive meals that get that “wow” reaction from friends and family, food that looks as incredible as it tastes.
The reality for most home cooks, however, is that time is short and culinary school wasn’t on the agenda. The gap between the beautiful food we aspire to make and the quick weeknight meals we actually cook can feel huge. We see “fancy meals” and immediately think “complicated,” “time-consuming,” and “expensive.”
Here’s the secret: creating good looking food is about leveraging simple techniques and smart recipes, not about spending all day in the kitchen. It’s about understanding how to use color, texture, and elegant plating to your advantage. This guide is your new playbook, filled with 9 curated, easy-to-follow recipes designed to deliver a massive visual impact with minimal stress, proving you can cook impressive, chef-worthy meals right at home.
Want to Cook Impressive Meals That Look as Good as They Taste?
The best way to cook impressive, good looking food is to focus on simple recipes that have a naturally elegant appearance and use smart techniques. This involves choosing fresh, colorful ingredients, learning basic skills like searing or creating a simple pan sauce, and paying a little attention to plating. This guide provides 9 easy recipes specifically chosen to help you achieve that professional look without the professional-level difficulty.
In my experience, the confidence you get from serving a truly beautiful dish is unmatched. It’s not about being a gourmet chef; it’s about having a few secret weapons in your culinary arsenal. These recipes are those secret weapons. They rely on store-bought shortcuts like puff pastry, quick-cooking proteins like scallops and mussels, and the natural beauty of vibrant ingredients.
Forget the idea that impressive means difficult. We’re going to focus on maximum “wow” factor with minimum fuss. Let’s get into the dishes that will make you look like a kitchen rockstar.
9 Easy Recipes for Good Looking Food That Will Dazzle Your Guests
Ready to transform your home cooking? Here is the core of this guide: a handpicked list of nine stunningly beautiful dishes that are secretly simple to make. Each recipe is broken down into easy steps and includes a special “Pro-Tip” from my own experience to guarantee success. We’ve got everything from elegant seafood to savory showstoppers and vibrant vegetarian options.
This isn’t just a list; it’s your new go-to for dinner parties, date nights, or any time you want to make a meal feel special.
Here’s the deal: pick one that catches your eye, follow the simple steps, and prepare for the compliments to roll in.
1. Perfectly Seared Scallops with Herb Brown Butter
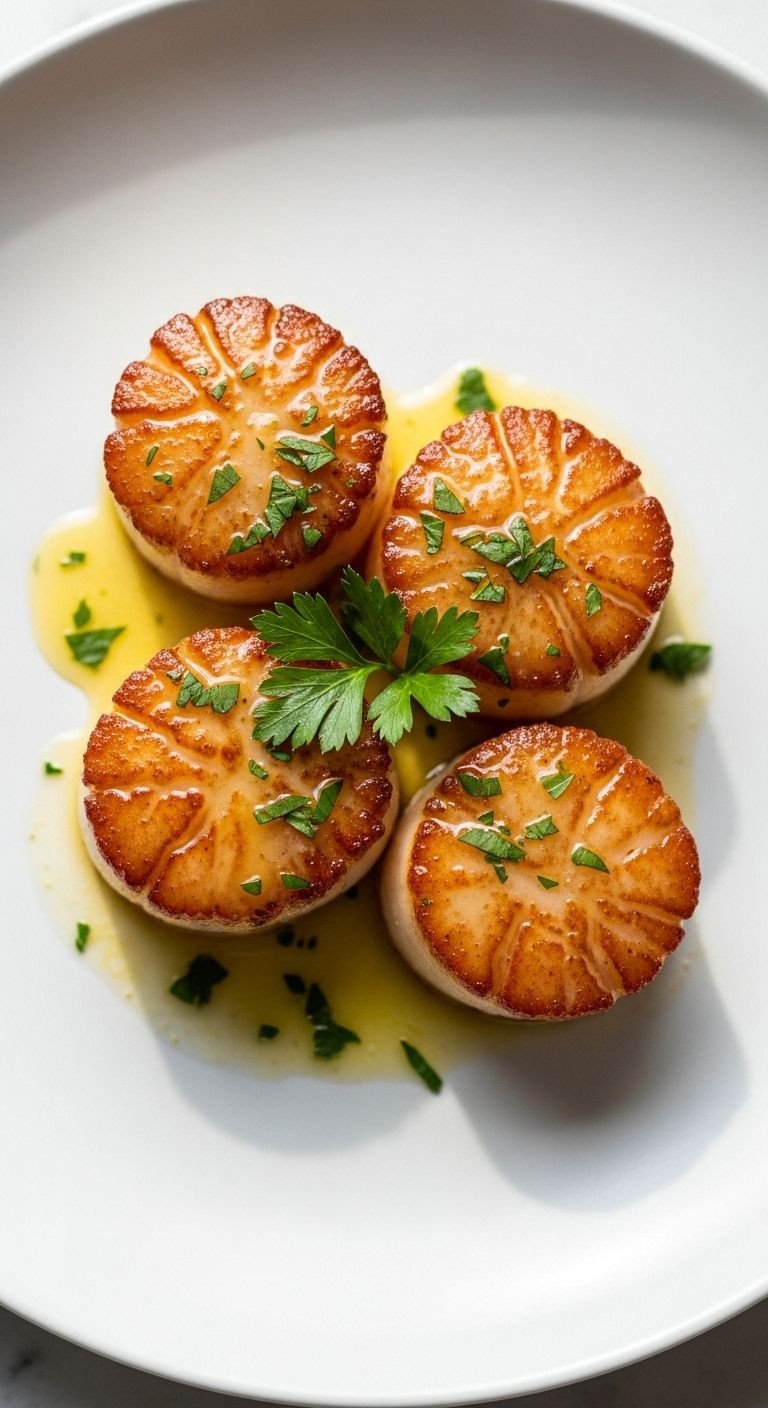
The key to restaurant-quality seared scallops is achieving a deep, golden-brown caramelized crust while keeping the inside tender and sweet. This recipe uses high heat and a simple herb-infused brown butter to create an incredibly impressive seafood dish in under 10 minutes.
Ingredients:
* 1 lb large sea scallops
* 3 tbsp unsalted butter
* 2 cloves garlic, minced
* 2 tbsp fresh parsley, chopped
* Salt and freshly ground black pepper
* 1 tbsp olive oil
Instructions:
1. Carefully remove the small side muscle from the scallops, if attached. Pat the scallops completely dry with a paper towel and season both sides with salt and pepper. This step is critical!
2. Heat the olive oil in a large skillet (cast-iron works best) over medium-high heat. The oil should be shimmering but not smoking.
3. Gently place the scallops in the pan in a single layer, ensuring they don’t touch. Do not overcrowd the pan; cook in batches if necessary. Sear for 1.5-2 minutes without moving them.
4. Flip the scallops. They should have a beautiful golden-brown crust. Add the butter to the pan. As it melts and begins to foam, add the minced garlic.
5. Cook for another 1-2 minutes, tilting the pan and using a spoon to baste the scallops with the foaming garlic butter.
6. Remove the pan from the heat, stir in the fresh parsley, and serve immediately.
Pro Tip: In my experience, the number one mistake people make is not getting the scallops dry enough. Any surface moisture will cause them to steam in the pan, which prevents that gorgeous, flavorful crust from forming. Take the extra minute to pat them bone-dry.
Save this elegant seafood recipe to your “Fancy Dinners” board!
2. Elegant Chicken in Puff Pastry
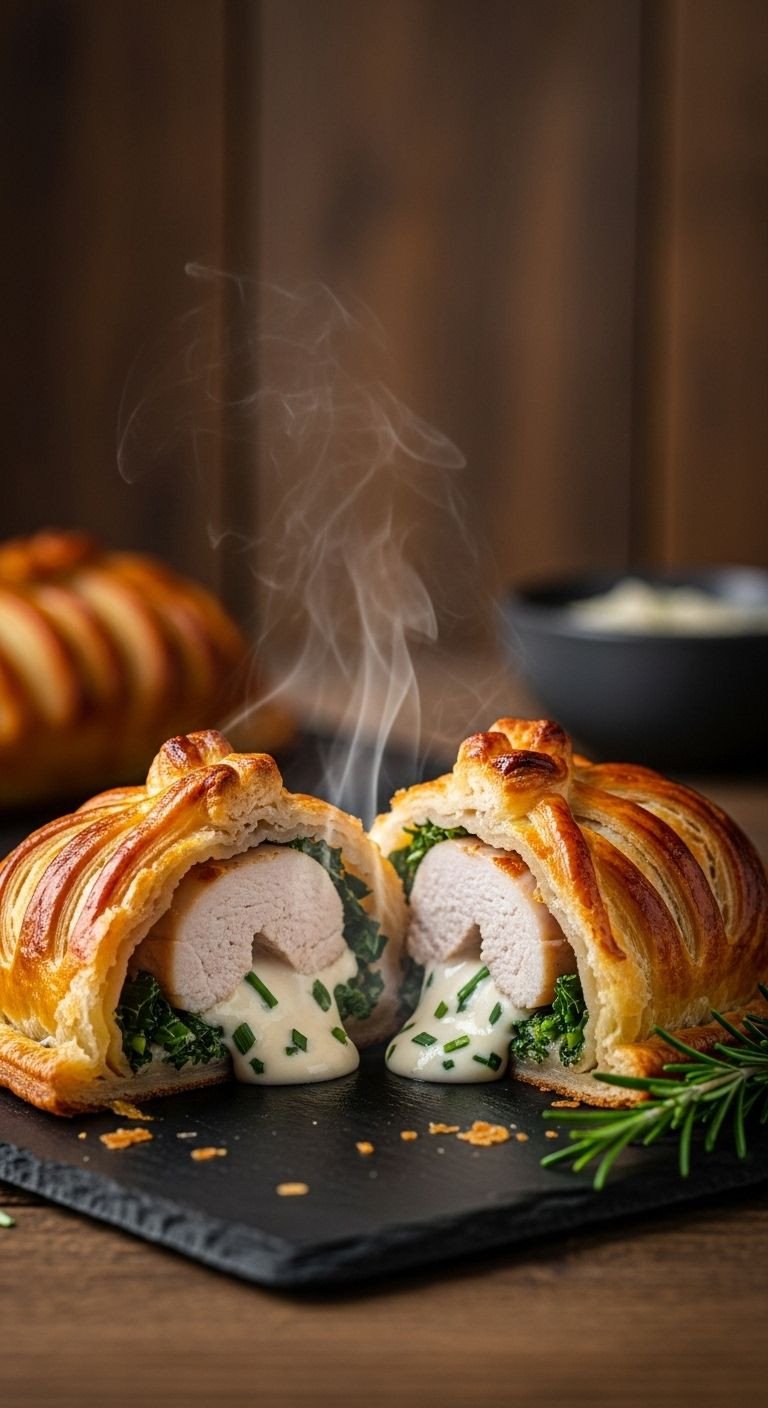
This recipe’s secret weapon is using store-bought puff pastry to wrap a seasoned chicken breast, creating a dish that looks like a complex chicken wellington but is incredibly simple. The golden, flaky crust and creamy filling make for a 5-ingredient showstopper.
Ingredients:
* 2 boneless, skinless chicken breasts
* 4 tbsp cream cheese, softened
* 2 tbsp chopped fresh chives
* 1 sheet frozen puff pastry, thawed
* 1 egg, beaten
* Salt and freshly ground black pepper
Instructions:
1. Preheat your oven to 400°F (200°C). Line a baking sheet with parchment paper.
2. Season the chicken breasts generously on all sides with salt and pepper.
3. In a small bowl, thoroughly mix the softened cream cheese and chopped chives.
4. Carefully cut a pocket into the thickest side of each chicken breast. Be careful not to cut all the way through. Stuff the pocket with the cream cheese mixture.
5. Unroll the thawed puff pastry sheet on a lightly floured surface and cut it in half. Place one stuffed chicken breast in the center of each pastry half.
6. Fold the pastry over the chicken, trimming any large excess. Press the edges firmly to seal completely. Place the parcels seam-side down on the prepared baking sheet.
7. Brush the entire surface of the pastry with the beaten egg.
8. Bake for 20-25 minutes, or until the pastry is puffed and a deep golden brown, and the chicken is cooked through (reaches 165°F or 74°C).
Pro Tip: For an extra decorative touch that requires almost zero effort, use the back of a knife to gently score a diamond or crosshatch pattern on top of the pastry before brushing with egg and baking. It looks incredibly professional when it comes out of the oven.
Pin this showstopper recipe for your next dinner party!
3. Vibrant Citrus and Avocado Salad
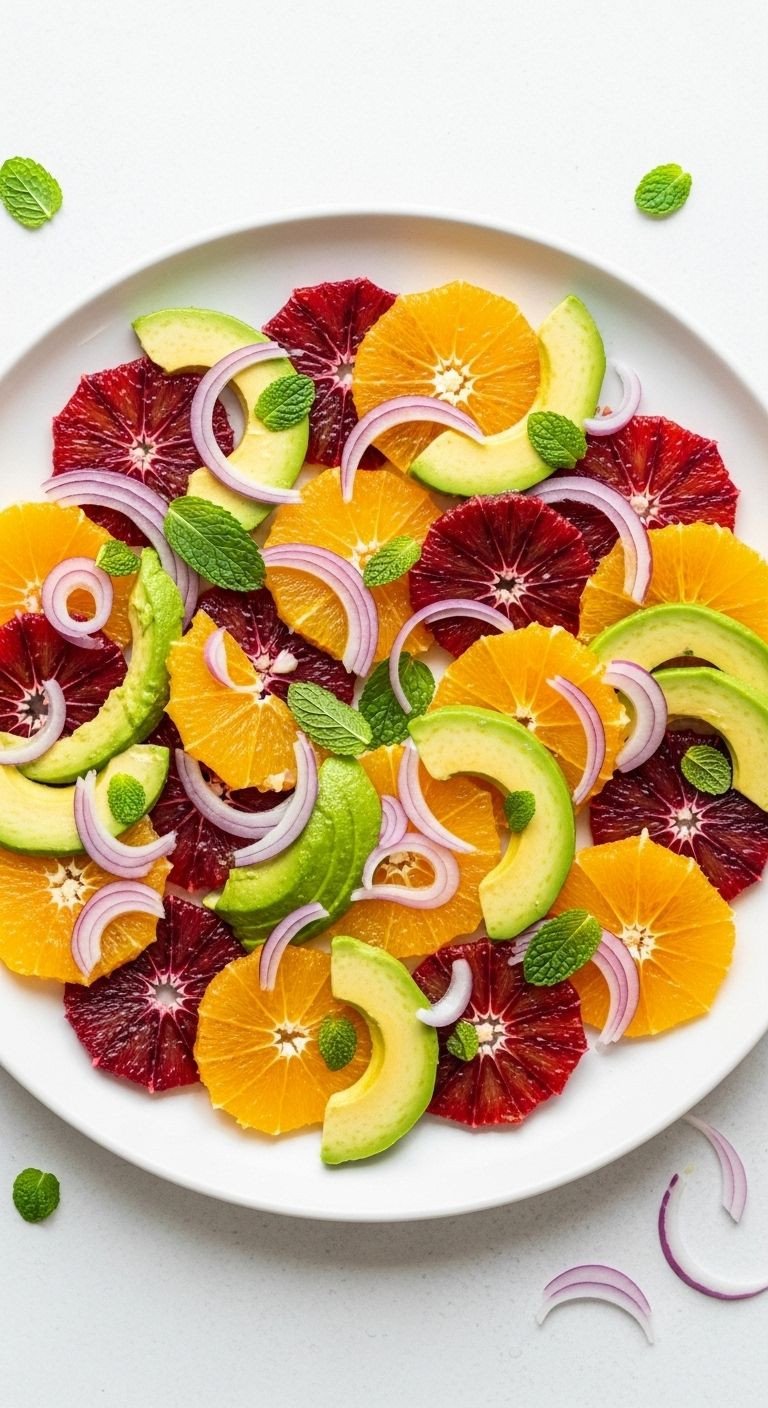
This salad’s beauty comes from artfully arranging slices of contrasting, colorful ingredients like blood oranges, navel oranges, and creamy avocado. It requires no cooking and is all about presentation, making it a stunning and healthy appetizer or side dish.
Ingredients:
* 2 blood oranges
* 1 navel orange
* 1 ripe but firm avocado
* 1/4 red onion
* 2 tbsp high-quality extra virgin olive oil
* Juice of 1 lime
* Flaky sea salt (like Maldon)
* Fresh mint leaves for garnish
Instructions:
1. Using a sharp knife, slice the top and bottom off the oranges. Stand them on a cutting board and slice downwards, following the curve of the fruit, to remove the peel and white pith. Then, slice the peeled oranges into thin rounds.
2. Cut the avocado in half, remove the pit, and peel. Slice it into thin pieces.
3. Very thinly slice the red onion, preferably with a mandoline for uniform slices.
4. On a large, clean white platter, begin arranging the orange slices and avocado slices, overlapping them to create a beautiful, circular pattern.
5. Scatter the thinly sliced red onion over the top.
6. Just before serving, drizzle with the olive oil and fresh lime juice.
7. Sprinkle generously with flaky sea salt and garnish with a few fresh mint leaves.
Pro Tip: One thing I learned is that contrast is everything here. To make the salad even more visually striking, use a mix of citrus like ruby red grapefruit or pale pink Cara Cara oranges alongside the others. The different colors and sizes create a mosaic effect that’s truly breathtaking.
Add this pop of color to your recipe collection! Save it now.
4. Creamy Wild Mushroom Risotto
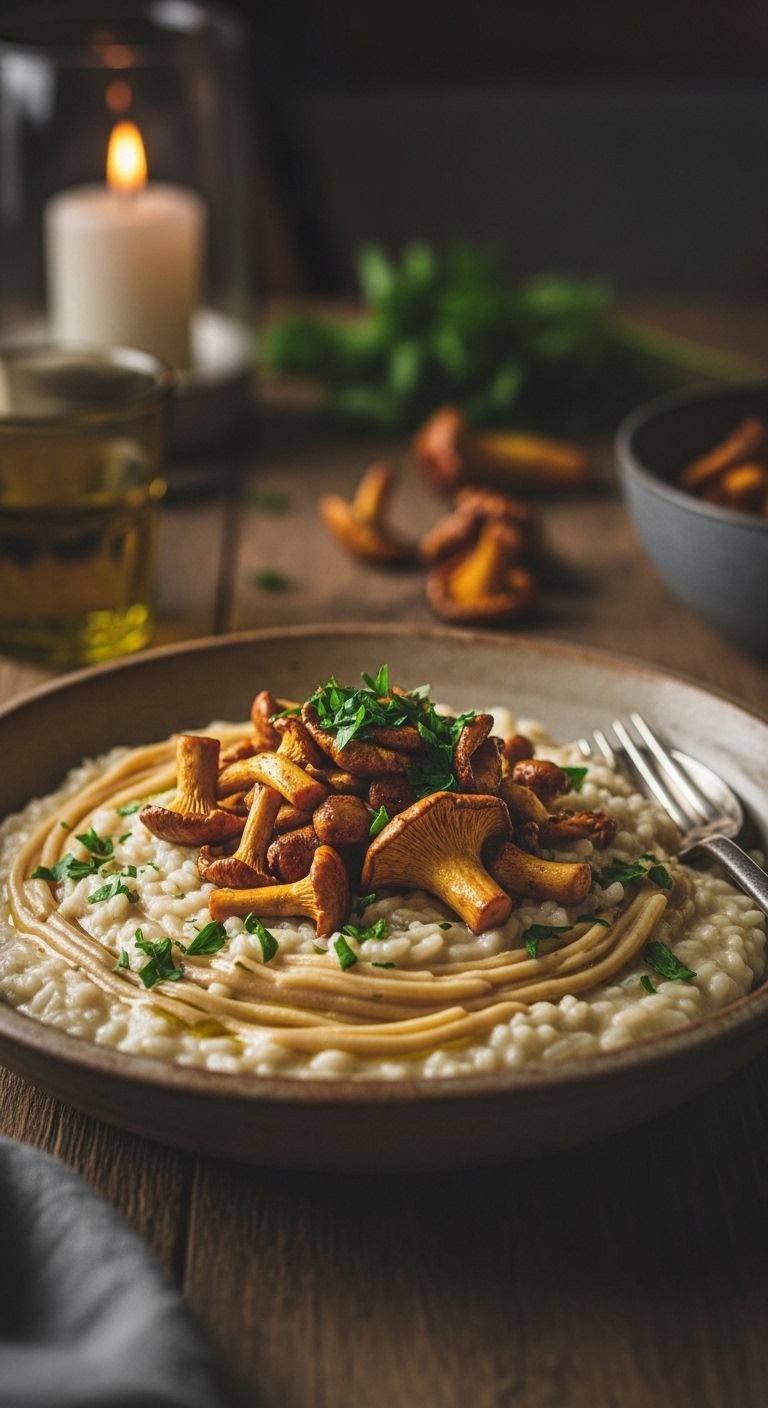
A perfect risotto is impressive because it achieves a luxuriously creamy texture without any cream, relying instead on the starch from Arborio rice. While it requires stirring, the process is simple and meditative, resulting in an elegant vegetarian main course that tastes and looks like it came from an Italian restaurant.
Ingredients:
* 1 tbsp olive oil
* 8 oz mixed wild mushrooms (cremini, shiitake, oyster), sliced
* 1 shallot, finely chopped
* 1.5 cups Arborio rice
* 1/2 cup dry white wine (like Pinot Grigio)
* 4-5 cups warm vegetable broth
* 1/2 cup freshly grated Parmesan cheese, plus more for serving
* 2 tbsp unsalted butter
* Fresh parsley, chopped
* Salt and pepper
Instructions:
1. In a large, heavy-bottomed pot or Dutch oven, heat the olive oil over medium-high heat. Add the sliced mushrooms and cook until they release their liquid and become golden brown. Remove half of the mushrooms and set them aside for garnish.
2. Add the chopped shallot to the pot with the remaining mushrooms and cook for 2 minutes until softened. Add the Arborio rice and stir constantly for 1 minute to toast the grains.
3. Pour in the white wine. Continue stirring until the wine is completely absorbed by the rice.
4. Begin adding the warm broth, one ladleful at a time. Stir frequently, and only add the next ladle of broth once the previous one has been mostly absorbed. This process should take about 18-20 minutes.
5. Continue until the rice is creamy and cooked to al dente (tender with a slight bite). You may not need all the broth.
6. Remove the pot from the heat. Vigorously stir in the Parmesan cheese and butter. This final step makes it extra creamy. Season well with salt and pepper.
7. Serve immediately in warm bowls, topped with the reserved sautéed mushrooms and a sprinkle of fresh parsley.
Pro Tip: Keeping your broth warm in a separate saucepan is non-negotiable. I learned this the hard way. Adding cold broth to the hot rice will shock it, cool everything down, and completely ruin the creamy texture you’re working so hard to build.
Craving comfort? Pin this elegant risotto recipe for later!
5. Bacon-Wrapped Pesto Pork Tenderloin
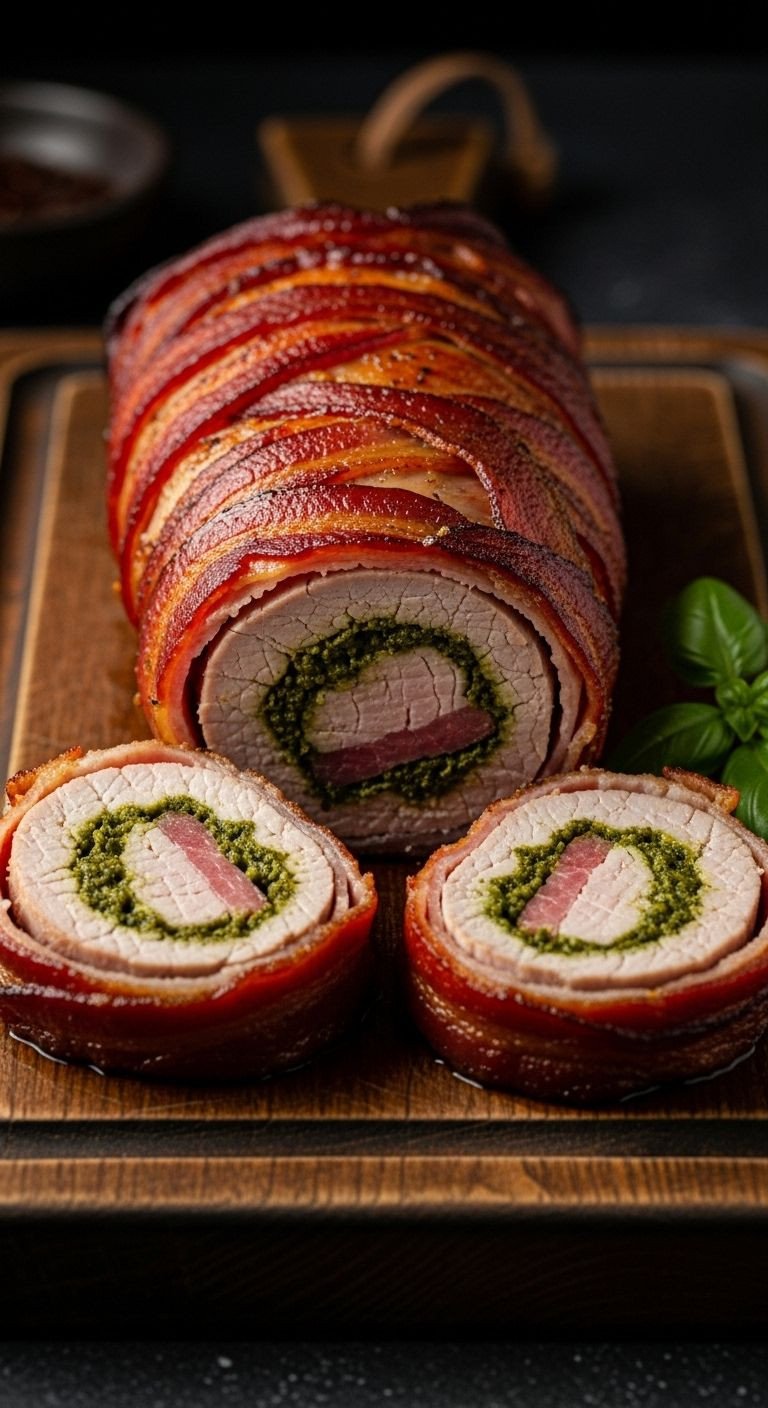
This dish looks spectacular due to the woven bacon exterior which creates a beautiful, textured crust around the juicy, pesto-slathered pork. It’s a straightforward assembly job that roasts into a centerpiece-worthy main course that’s packed with flavor.
Ingredients:
* 1 pork tenderloin (about 1 lb)
* 1/4 cup prepared basil pesto
* 8-10 slices of thin-cut bacon
* Salt and freshly ground black pepper
Instructions:
1. Preheat your oven to 400°F (200°C).
2. Pat the pork tenderloin dry with paper towels and season it lightly with salt and pepper. Remember the bacon and pesto are already salty. Spread the basil pesto evenly over the entire surface of the tenderloin.
3. On a piece of parchment paper or a cutting board, create a bacon weave. Lay 4-5 slices of bacon vertically, side-by-side. Fold back every other strip and lay a horizontal strip of bacon across. Unfold the vertical strips. Now fold back the other vertical strips and lay another horizontal strip across. Repeat until you have a woven mat large enough to cover the tenderloin.
4. Place the pesto-covered tenderloin at one end of the bacon weave and use the parchment paper to help you roll it up tightly.
5. Place the wrapped tenderloin, seam-side down, in a roasting pan or on a wire rack set inside a baking sheet.
6. Roast for 25-30 minutes, or until the bacon is brown and crispy and the pork reaches an internal temperature of 145°F (63°C).
7. Let the tenderloin rest for 10 minutes before slicing and serving. This is crucial for a juicy result.
Pro Tip: Use thin-cut bacon for this. It weaves much more easily and, more importantly, it crisps up perfectly in the time it takes to cook the pork. Thick-cut bacon often remains floppy and undercooked while the pork inside gets overcooked.
Save this to your “Weeknight Wins” board for a truly impressive meal!
6. Simple Mussels in White Wine & Garlic Broth
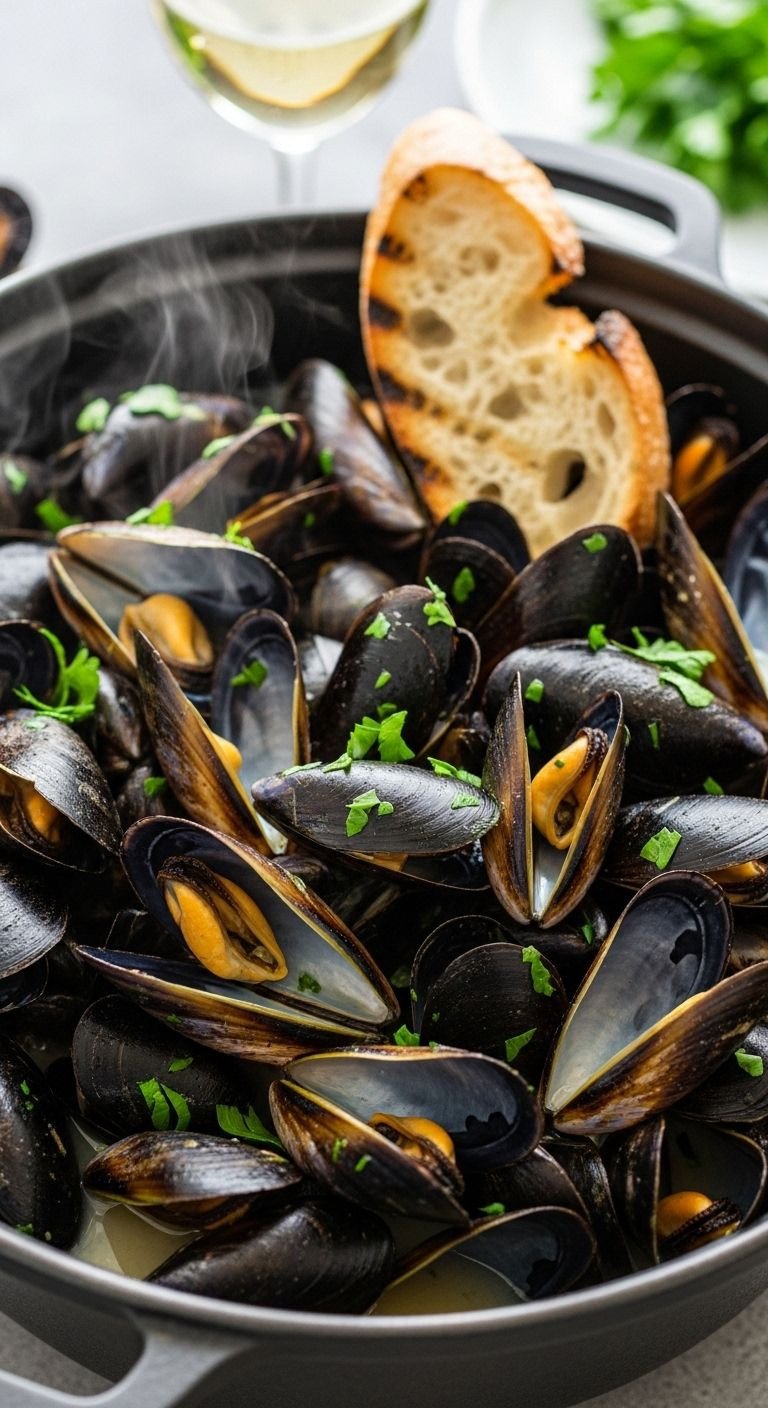
This classic bistro dish is impressive because a big, steaming pot of opened mussels just feels celebratory and luxurious, yet it cooks in under 10 minutes. The fragrant, buttery white wine and garlic broth is perfect for dipping crusty bread, making it a fun, interactive, and beautiful one-pot meal.
Ingredients:
* 2 lbs fresh mussels
* 2 tbsp butter
* 3 cloves garlic, thinly sliced
* 1 shallot, finely chopped
* 1 cup dry white wine (like Sauvignon Blanc)
* 1/2 cup chopped fresh parsley
* Crusty bread for serving
Instructions:
1. First, clean the mussels. Place them in a colander under cold running water. Scrub any grit off the shells and pull off the “beards” (the stringy bits). Discard any mussels with broken shells.
2. In a large pot or Dutch oven with a lid, melt the butter over medium heat. Add the sliced garlic and chopped shallot and cook until fragrant, about 1-2 minutes.
3. Pour in the white wine, increase the heat to bring it to a simmer, and let it cook for 2 minutes to burn off some alcohol.
4. Add the cleaned mussels to the pot and immediately cover with the lid.
5. Let the mussels steam for 5-7 minutes, giving the pot a good shake once or twice. They are done when all the shells have popped open.
6. Stir in the fresh parsley. Important: Discard any mussels that remain closed after cooking.
7. Ladle the mussels and broth into large, shallow bowls and serve immediately with plenty of crusty bread for dipping.
Pro Tip: Here’s a crucial food safety tip I always follow: before cooking, inspect your mussels. Tap any that are slightly open on the counter. If they slowly close up, they’re alive and safe to eat. If they stay open after a tap, they are no longer alive and should be discarded.
Pin this 15-minute gourmet meal for an easy, impressive dinner!
7. Impressive Stuffed Chicken Rolls
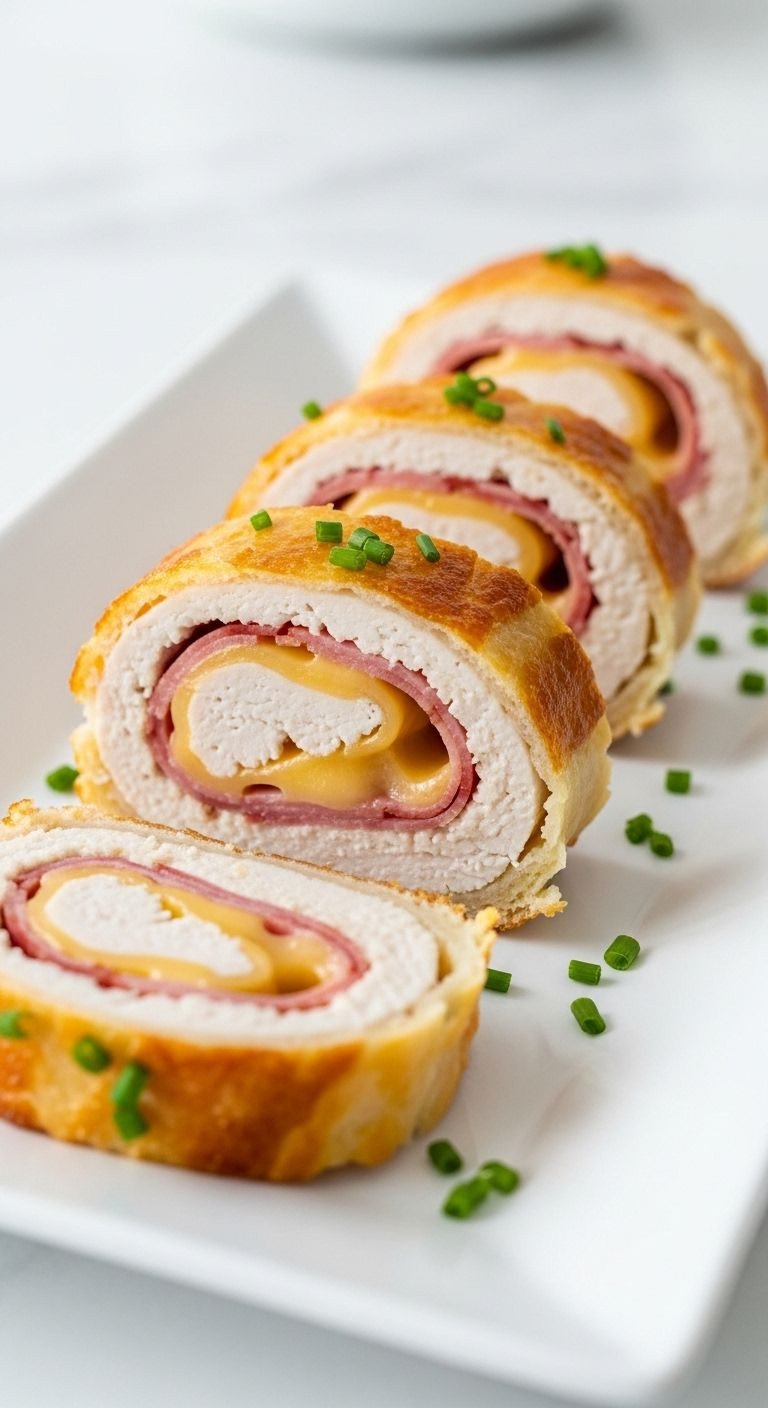
The “wow” factor of this dish comes from the reveal—when you slice into the golden-brown chicken roll and see the beautiful spiral of ham and melted cheese inside. It’s a simple roll-and-bake technique that makes a basic chicken breast look incredibly sophisticated.
Ingredients:
* 4 boneless, skinless chicken breasts
* 4 slices of deli ham
* 4 slices of Swiss cheese
* 1/2 cup Italian-style breadcrumbs
* 1/4 cup grated Parmesan cheese
* 1 tsp paprika
* 2 tbsp olive oil
* Salt and pepper
Instructions:
1. Preheat your oven to 375°F (190°C).
2. Place the chicken breasts one at a time between two sheets of plastic wrap. Using a meat mallet or a rolling pin, pound them to an even 1/4-inch thickness.
3. Season both sides of the pounded chicken with salt and pepper.
4. Lay one slice of ham and one slice of cheese on top of each chicken breast.
5. Starting from one of the shorter ends, roll each breast up tightly into a log. Secure the seam with a couple of toothpicks.
6. In a shallow dish, combine the breadcrumbs, Parmesan cheese, and paprika.
7. Brush each chicken roll with olive oil, then dredge it in the breadcrumb mixture, pressing gently to make sure it’s fully coated.
8. Place the chicken rolls on a baking sheet. Bake for 25-30 minutes, or until the coating is golden and the chicken is cooked through.
9. Let them rest for 5 minutes, then remove the toothpicks and slice on a diagonal before serving to show off the spiral.
Pro Tip: After you roll the chicken, if you have time, chill the uncooked rolls in the refrigerator for 15-20 minutes before you bread them. In my experience, this helps the roll hold its shape firmly, making it much easier to handle and ensuring a perfect, tight spiral after baking.
Save this fun and fancy chicken recipe to your dinner ideas board!
8. Easy Homemade Sweet Potato Ravioli
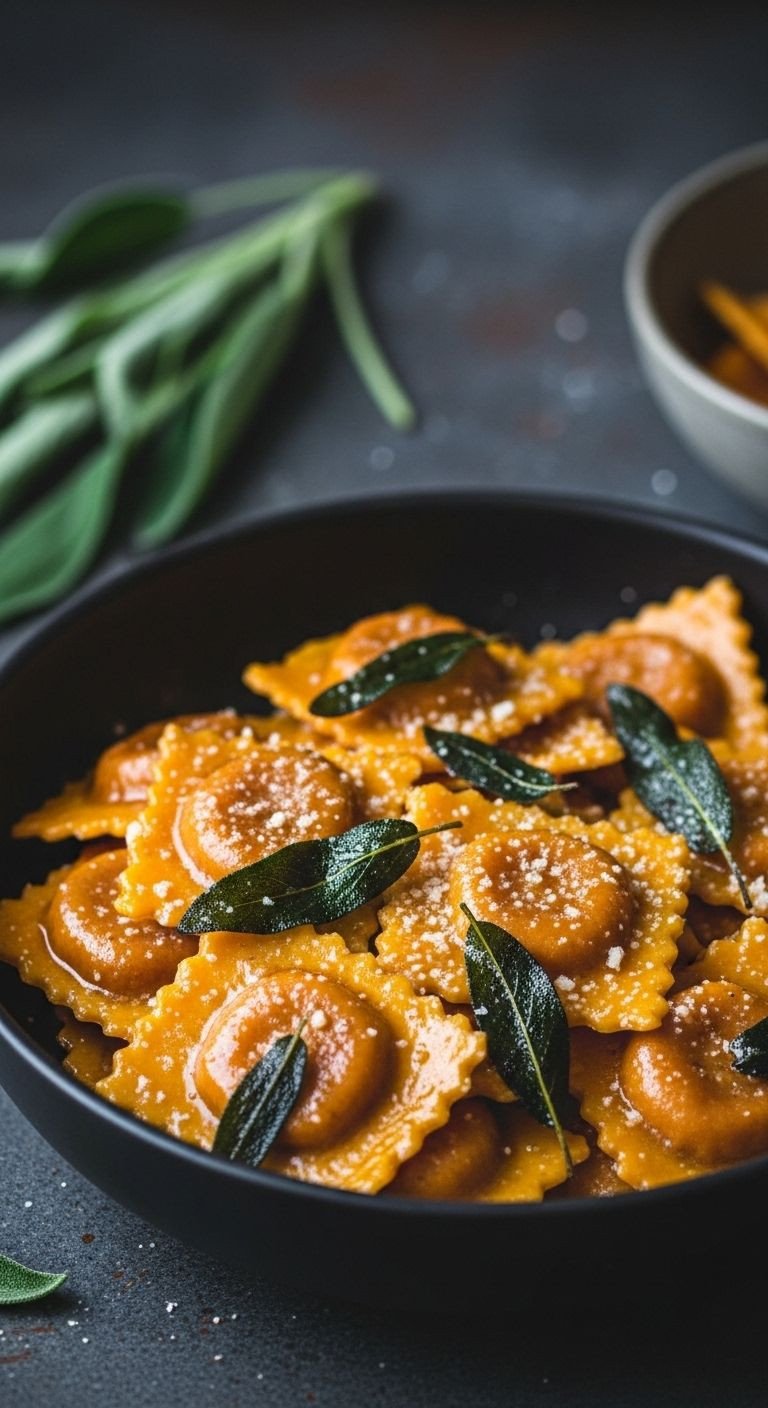
Homemade ravioli sounds advanced, but this recipe is impressive because it uses a simple, flavorful filling and a shortcut with wonton wrappers to create beautiful, pillowy pasta. The vibrant orange filling peeking through the dough, tossed in a simple brown butter and sage sauce, is pure elegance.
Ingredients:
* 1 cup roasted sweet potato puree
* 1/4 cup whole-milk ricotta cheese
* Pinch of nutmeg
* Salt and pepper
* 1 package fresh pasta sheets or square wonton wrappers (the shortcut!)
* 1/2 cup (1 stick) unsalted butter
* A handful of fresh sage leaves
Instructions:
1. In a bowl, mix the sweet potato puree, ricotta cheese, a pinch of nutmeg, salt, and pepper until well combined.
2. Lay a pasta sheet or wonton wrapper on a lightly floured surface. Place teaspoon-sized dollops of the sweet potato filling about 2 inches apart.
3. Using your finger or a pastry brush, brush the pasta around the filling with a little water. Lay a second pasta sheet or wrapper on top.
4. Press down firmly around each mound of filling to seal, pushing out any air bubbles.
5. Use a knife, pizza cutter, or a ravioli cutter to cut out individual ravioli. You can crimp the edges with a fork for a classic look.
6. Cook the ravioli in a large pot of boiling, salted water for 3-4 minutes (or 2-3 for wontons), until they float to the surface.
7. While the ravioli cook, melt the butter in a large skillet over medium heat. Add the whole sage leaves and cook until the butter starts to brown and smell nutty, and the sage leaves are crispy.
8. Use a slotted spoon to transfer the cooked ravioli directly from the water into the brown butter sauce. Toss gently to coat and serve immediately.
Pro Tip: One thing I learned quickly is not to overfill the ravioli. It’s so tempting to put a big scoop of that delicious filling in, but it makes them much more likely to burst while cooking. A small, neat teaspoon is all you need for beautiful, intact ravioli.
Ready for a cooking project? Pin this homemade ravioli tutorial!
9. Sophisticated Greek Yogurt Herb Dip
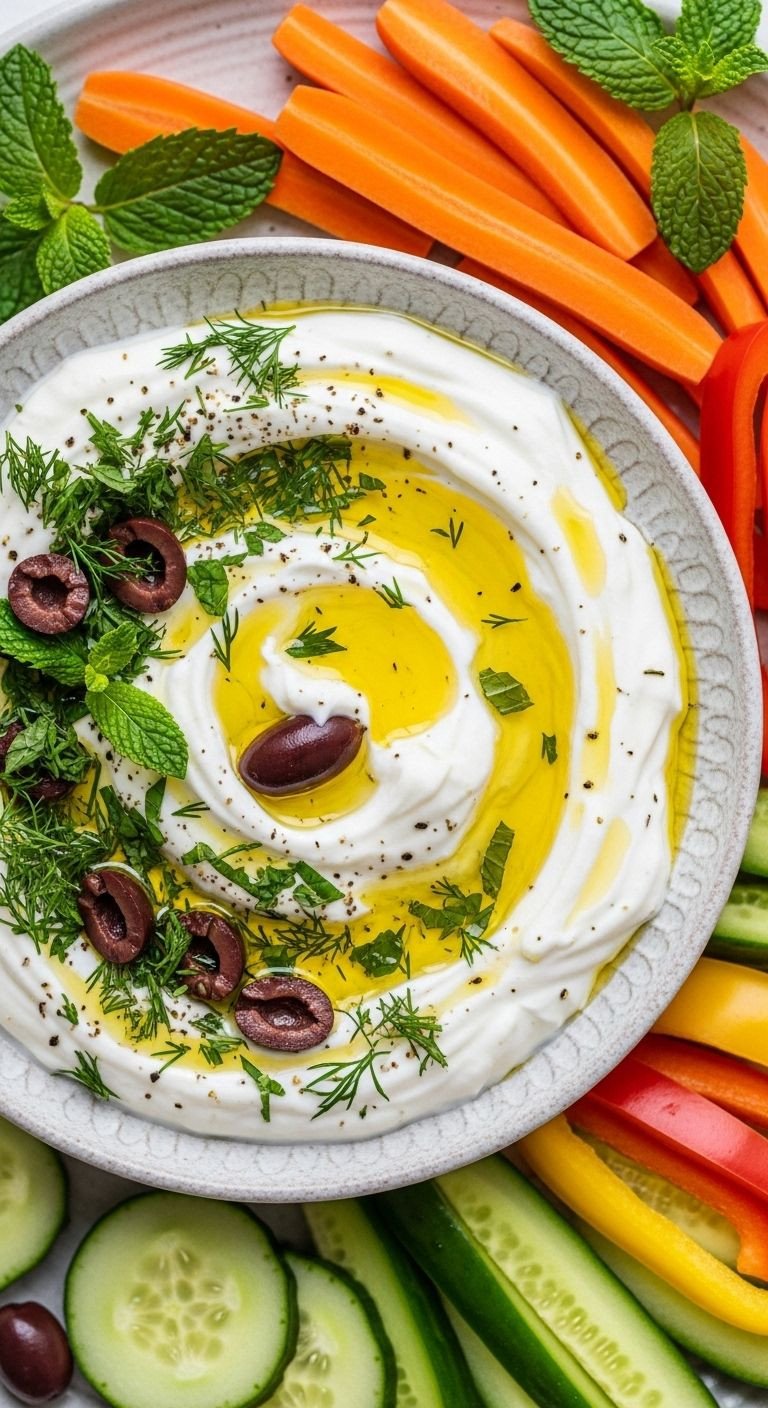
This no-cook appetizer looks incredibly sophisticated thanks to the vibrant green herbs against the stark white yogurt and a glossy pool of golden olive oil. It’s a 5-minute dip where the beauty comes entirely from fresh ingredients and a simple, artful presentation.
Ingredients:
* 1 cup full-fat Greek yogurt
* 1/4 cup finely chopped fresh dill
* 2 tbsp finely chopped fresh mint
* 1 clove garlic, minced or grated
* Juice of half a lemon
* 2 tbsp high-quality extra virgin olive oil, plus more for drizzling
* Salt and freshly ground black pepper
* Optional garnishes: Kalamata olives, a sprinkle of paprika, extra fresh herbs
Instructions:
1. In a medium bowl, combine the Greek yogurt, chopped dill, mint, minced garlic, and lemon juice.
2. Season generously with salt and pepper and mix until everything is well combined.
3. Spoon the dip into a shallow, attractive serving bowl. Use the back of your spoon to create a deep, beautiful swirl on the surface.
4. Drizzle generously with your best extra virgin olive oil, letting it pool in the swirl you created.
5. Garnish with a few Kalamata olives, a light sprinkle of paprika for a pop of color, and a few extra reserved herb leaves.
6. Serve with warm pita bread, crisp crackers, or a colorful array of fresh vegetables like carrot sticks, cucumber slices, and bell pepper strips.
Pro Tip: The quality of the olive oil makes a huge difference here. Since it’s a finishing touch, its flavor really shines through. Use your best, most flavorful extra virgin olive oil for drizzling on top. It not only tastes better but also adds a beautiful, glossy finish that makes the dip look extra special.
Pin this 5-minute elegant appetizer for your next get-together!
Key Takeaways: Your Quick Guide to Good Looking Food
Feeling inspired? Remember, making food look good doesn’t require a culinary degree. It just requires a little intention. Here are the core principles we’ve covered that you can apply to almost any dish you make.
- Embrace Color: Use ingredients with natural, vibrant, and contrasting colors. A plate with multiple colors, like the Citrus and Avocado Salad, is instantly more appealing.
- Fresh Herbs are Essential: A generous sprinkle of fresh parsley, dill, chives, or mint is the fastest way to add instant freshness, color, and a professional touch to almost any savory dish.
- The “Golden-Brown” Rule: A perfect, deep golden-brown sear on scallops or a crispy, golden crust on puff pastry is a visual cue for delicious flavor. Don’t be afraid of high heat to achieve it.
- The Reveal is Everything: Dishes that have a beautiful cross-section when you cut into them offer a delightful surprise. Think of the spiral in the Stuffed Chicken Rolls or the colorful filling in the Bacon-Wrapped Pork.
- Sauce and Garnish Wisely: A glossy pan sauce, a glistening drizzle of high-quality olive oil, or a simple but elegant garnish can elevate a humble dish into something truly special. Plating matters!
People Also Ask About Good Looking Food
When we start thinking about food presentation, a few common questions always pop up. Here are direct answers to some of the most frequent queries.
How do you compliment good looking food?
To compliment good looking food, go beyond “it looks good” and use descriptive words that engage the senses. For example, say “The colors are so vibrant, it looks incredibly fresh!” or “That golden crust looks perfectly crispy and delicious.” You can also compliment the arrangement: “I love how you plated this, it looks like a work of art.” Mentioning a specific, appealing element shows you’re paying genuine attention.
How can I make my homemade food look more professional?
To make homemade food look professional, focus on three key areas: clean plating, adding height, and smart garnishing. First, use a clean, large plate and resist the urge to overcrowd it; negative space is your friend. Second, try to build height by stacking elements instead of laying them flat. Finally, always finish with a thoughtful garnish—fresh herbs, a sprinkle of flaky salt, a drizzle of quality oil, or a lemon wedge can instantly elevate the entire dish.
What makes a dish look impressive but is actually easy?
The most impressive yet easy dishes often rely on a “hero” ingredient or a simple technique that yields dramatic results. Using store-bought puff pastry to encase chicken, steaming a big pot of mussels in a flavorful broth, or perfectly searing scallops are all quick processes that look complex. These dishes give you that restaurant-quality feel with minimal active cooking time and straightforward steps.
Final Thoughts
Creating good looking food is not about perfection; it’s about pleasure—both in the making and the eating. It’s about having a few key recipes and simple techniques up your sleeve that build your confidence and allow you to share something truly special with the people you care about.
With these nine ideas, you’re well on your way to demystifying the art of presentation and proving to yourself that you can make meals that both dazzle the eyes and delight the palate. Remember, a little attention to color, texture, and plating can turn a simple home-cooked meal into an unforgettable one.
Which of these recipes are you most excited to try first? Share your thoughts and any of your own tips for making food look amazing in the comments below
