
As an Amazon Associate KitchenwareSets.com earns from qualifying purchases.
Modern Rustic Farmhouse Kitchen: 13 Warm Design Ideas
Does your dream kitchen feel trapped between two worlds? You crave the clean, open lines of a modern space, but pure minimalism leaves you cold. A fully rustic kitchen, with its heavy dark wood and knick-knacks, can feel stuck in the past.
A modern rustic farmhouse kitchen intentionally blends clean-lined, contemporary cabinetry and appliances with raw, natural materials like reclaimed wood, stone, and wrought iron. The result is a space that feels both fresh and lived-in, combining the warmth of traditional farmhouse style with the uncluttered simplicity of modern design. It’s a curated balance, not a random mix.
Drawing from proven design principles and real-world remodeling insights, this guide delivers 13 concrete ideas to help you build that balanced kitchen. Each idea includes material recommendations, practical steps, and expert tips—so you can confidently create a space that feels timeless, warm, and unmistakably yours.
Contents
show
13 Warm Design Ideas to Create Your Modern Rustic Farmhouse Kitchen
1. Install Exposed Wood Ceiling Beams for Instant Warmth

Pin this idea to your “Kitchen Beams” board for inspiration!
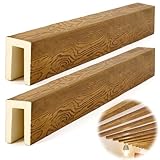
Exposed wood ceiling beams are the quickest way to add architectural drama and rustic warmth without a full structural redo. They anchor the room visually, drawing the eye upward and making the ceiling feel intentional.
Supplies Needed
- Faux wood beams (polyurethane or lightweight reclaimed) – measure ceiling length + 10%
- Construction adhesive (PL Premium) or screw kit
- Stud finder, level, miter saw
- Paintable caulk, wood stain (if using raw wood)
Installation Steps
- Locate ceiling joists with stud finder and mark beam placement at 4–6 ft intervals.
- Cut beams to length using a miter saw for clean ends. (If installing multiple, stagger seams).
- Apply adhesive generously along the back channel, then press beam into place. For heavy beams, pre-drill and screw into joists, then cover screw heads with wood plugs.
- Caulk gaps along edges and paint or stain to match your kitchen’s trim color.
- (Optional) Hang pendant lights from beams for dramatic effect.
Pro-Tip: Polyurethane faux beams are a fraction of the weight of real wood—no need for extra ceiling reinforcement—and come pre-stressed with authentic saw marks and knots.
2. Pair a White Shaker Kitchen Island with a Dark Stained Butcher Block Top

Save this stunning island combo to your “Kitchen Island Goals” board!
The island is the heart of a modern rustic kitchen. A white shaker island keeps the space light and airy, while a dark stained butcher block top introduces warmth and a natural work surface that gets better with age.
What You Need
- White shaker base cabinet (or custom island frame) – standard depth 24″, width min 60″
- Butcher block countertop (walnut or acacia) – cut to size with overhang for seating
- Black metal bar stools (counter height or bar height)
- Stain (if raw wood), food-safe mineral oil, adhesive silicone
How to Build the Pairing
- Install or assemble the white shaker base cabinet, ensuring it’s level and anchored to the floor per code.
- Cut butcher block to desired size (include overhang: 12–15″ for seating). Sand edges smooth.
- Apply stain (e.g., Dark Walnut) if needed, then seal with 3–4 coats of food-safe mineral oil or butcher block conditioner, allowing 24 hrs between coats.
- Place top on cabinet and secure with silicone adhesive from below—no visible screws.
- Arrange black metal stools around the island. Leave 15″ of knee space between stool seat and counter edge.
Pro-Tip: Maple butcher block is harder and more heat-resistant than walnut, but walnut’s rich dark grain better matches black accents. If using walnut, be extra careful with hot pans.

3. Hang Sleek Black Pendant Lights Over the Island

Pin these stunning pendants to your “Lighting Love” board!
Sleek black pendant lights are the perfect modern counterpoint to rustic wood textures. Their clean, industrial silhouette draws the eye and defines the island as a functional zone. Choose matte black cone or dome shades for a refined edge.
Supplies Needed
- 3 matching black pendant lights with swag or hardwire kit
- Ceiling hooks or junction boxes
- Wire strippers, voltage tester, ladder
- Edison bulbs (warm white 2700K) for vintage glow
Installation Steps
- Determine island center and mark pendant positions evenly: space them 24–30” apart.
- Install junction boxes in ceiling. If no existing boxes, use a ceiling-rated hook for swag lights.
- Wire pendants according to manufacturer instructions (turn off breaker first).
- Hang pendants so bottom of shade is 30–36” above island countertop.
- Screw in Edison bulbs. Install dimmer switch for adjustable warmth.
Pro-Tip: Don’t use daylight (5000K) bulbs—they make wood tones look gray. Stick to 2700K–3000K for that cozy modern rustic glow.

4. Incorporate Open Reclaimed Wood Shelving

Save this open shelving idea to your “Kitchen Shelves” board!
Open reclaimed wood shelving replaces upper cabinets with an airy, curated display. It softens the kitchen, adds texture, and forces you to keep only beautiful essentials within reach. Choose thick, rough-sawn planks with visible grain for maximum rustic impact.
Materials Needed
- Reclaimed wood planks (1×8 or 1×10) cut to desired length
- Floating shelf brackets or heavy-duty concealed brackets
- Stud finder, level, drill, screws
- Clear matte polyurethane or Danish oil (to seal wood)
Steps to Install
- Locate studs using stud finder and mark level lines for shelves.
- Attach brackets to wall using screws into studs (or toggle bolts if no studs).
- Pre-drill holes in reclaimed wood and slide onto brackets, or attach wood top to brackets with screws from below.
- Seal wood with polyurethane to protect from kitchen moisture and cooking grease.
- Style shelves: group dishes, glass jars, cookbooks in odd numbers; leave negative space for a clean look.
Pro-Tip: If you have small children or pets, avoid open shelves near the stove—grease splatter is hard to clean off textured wood. Install them on a dry wall opposite the cooking surface.

5. Install a Modern Apron-Front Farmhouse Sink

Pin this dreamy sink setup to your “Farmhouse Kitchen” board!
An apron-front farmhouse sink is the single most iconic element of farmhouse style, but a modern version updates the look with clean lines and a deep, single basin. Pair it with a sleek chrome or matte black faucet for an intentional blend.
What You Need
- Apron-front sink (fireclay or stainless) – measure width (30–36” standard)
- Base cabinet modified for apron front or specialty sink cabinet
- Gooseneck or pull-down kitchen faucet, chrome or matte black
- Plumber’s putty, silicone caulk, adjustable wrench
Installation Steps
- Prep cabinet: remove drawer front and cut out front panel per sink template. Or buy a dedicated apron-front cabinet.
- Set sink in countertop opening (if undermount) or drop from top (if flush mount). Apply silicone caulk around rim.
- Connect drain assembly and water supply lines per local plumbing code.
- Install faucet: thread supply lines through deck, tighten mounting nut, connect to shut-off valves.
- Caulk around edges and allow 24 hrs to cure before heavy use.
Pro-Tip: Fireclay sinks are heavier than cast iron—check floor joists for needed reinforcement. A standard 33” fireclay sink weighs 80–100 lbs empty.

6. Use Matte Black Cabinet Hardware

Pin this hardware upgrade to your “Cabinet Details” board!
Matte black cabinet hardware is the single highest-impact, lowest-effort change you can make. It instantly modernizes any cabinet, adds an industrial edge, and ties together black accents elsewhere in the kitchen.
Supplies Needed
- Matte black T-bar pulls (measure existing spacing or 3” for small drawers, 5” for standard cabinets)
- Black knobs (for upper cabinets if desired)
- Cabinet hardware template or custom cardboard jig
- Drill, screwdriver, screws (often included)
Steps to Install
- Remove old hardware and fill old holes with wood filler if necessary.
- Use template to mark exact positions for new pulls on drawer fronts and doors.
- Drill pilot holes slightly smaller than screws (to prevent wood splitting).
- Screw pulls in from back of door/drawer, ensuring they’re level.
- (Optional) Install knobs on upper cabinet doors for a mixed pull/knob look.
Pro-Tip: For a cohesive look, use the same finish on your sink faucet, island pendant lights, and cabinet pulls. Matte black ties the whole kitchen together.

7. Install Wide Plank Hardwood Floors

Pin this flooring idea to your “Kitchen Floors” board!
Wide plank hardwood floors make a kitchen feel grounded and expansive. Planks 6–8 inches wide show off the natural grain and create a rustic foundation that contrasts beautifully with sleek white cabinetry. Engineered hardwood resists moisture better than solid wood in kitchens.
Materials Needed
- Wide plank engineered hardwood (6–8” wide, 1/2” thick) with click-lock or nail-down
- Underlayment (moisture barrier) if required
- Circular saw or miter saw, tapping block, pull bar
- Vapor barrier, trim and quarter round
Installation Steps
- Acclimate flooring in kitchen for 48–72 hours (temperature and humidity stable).
- Install underlayment per manufacturer instructions.
- Start first plank row along longest straight wall, leaving 1/2” expansion gap at walls.
- Continue laying planks using click-lock system. Use tapping block to ensure tight seams.
- Cut planks to fit around islands and cabinets. Transition strips at doorways.
- Install quarter round baseboards to cover expansion gap.
Pro-Tip: For a kitchen that truly feels warm and rustic, choose a floor with a hand-scraped or wire-brushed texture. It hides daily scratches far better than a smooth glossy finish.

8. Add a Subway Tile Backsplash with Dark Grout

Save this backsplash inspiration to your “Kitchen Tile” board!
Subway tile with dark grout is the quintessential modern farmhouse backsplash. The white tile keeps the kitchen bright, while charcoal or black grout adds definition and hides cooking splatters. The brick pattern adds just enough visual texture.
Supplies Needed
- White subway tile (3×6” or 4×8”) – buy 10% extra for cuts
- Dark sanded grout (charcoal or black)
- Trowel, tile spacers (1/8” or 1/16”), tile cutter, sponge
- Thin-set mortar, grout float, sealant
Installation Steps
- Prepare wall: clean, remove old backsplash, fill holes, apply waterproofing membrane if needed.
- Spread thin-set mortar with trowel, then press tiles onto wall in brick pattern, using spacers for even gaps.
- Cut tiles to fit around outlets and edges. Let mortar set 24 hrs.
- Remove spacers and apply dark grout with float, forcing into joints.
- Wipe excess grout with damp sponge. Let cure, then seal (especially important with dark grout to prevent staining).
Pro-Tip: Dark grout makes the white tile pop and hides cooking splatters better than light grout. But test on a sample board first—it also shows any uneven tile edges.

9. Incorporate a Barn Door Pantry

Pin this barn door pantry idea to your “Pantry Goals” board!
A sliding barn door over the pantry is both functional and dramatic. It saves swing space, adds a massive dose of rustic character, and can be tailored to match your exact wood tone. Use black metal hardware to tie into the modern accents.
What You Need
- Barn door (custom wood slab or DIY reclaimed wood)
- Sliding door hardware kit (including track, hangers, stops)
- Level, stud finder, drill, screws
- (Optional) Paint or stain for door finish
Steps to Install
- Measure pantry opening width and height; buy door that is at least 4” wider and 2” taller for full coverage.
- Mount track to header board that is securely fastened to wall studs (reinforce with blocking if needed).
- Attach hangers to top of door, then hang door on track. Install floor guide to prevent swinging.
- Adjust door height with hanger bolts so it glides smoothly.
- Install door handle (recessed or flush) for easy sliding.
Pro-Tip: If you have pets or small kids, choose a barn door with a soft-close mechanism—they won’t slam shut and startle anyone.

10. Mix Vintage-Style Light Fixtures with Modern Appliances

Pin this mix of old and new to your “Style Blending” board!
This is where the “modern rustic” magic really happens. Pairing a sleek stainless steel range with a vintage-style milk glass pendant creates a deliberate, curated contrast. The key is to let the rustic fixtures steal the show while modern appliances hum along in the background.
Materials Needed
- Vintage-style pendant light (milk glass, brass, or woven)
- Modern stainless steel range (gas or induction)
- Matching modern fridge (panel-ready or stainless)
- (Optional) Aged brass or oil-rubbed bronze switch plates
Tips to Blend Styles
- Anchor on metal finishes: If appliances are stainless steel, choose vintage lights with a brushed nickel or chrome finish to avoid clashing. If you want brass lights, use black stainless appliances or matte black.
- Play with scale: Large modern refrigerators look less dominant next to statement vintage pendants or a reclaimed wood hood surround.
- Balance textures: A smooth stainless steel range pairs well with ribbed glass pendants or a woven rattan shade.
- Light placement: Install vintage pendants over the island or breakfast bar, not directly over the modern range (heat + grease may damage the fixture).
Pro-Tip: For a seamless blend, use the same vintage-style light fixtures throughout the kitchen but keep the appliances subdued—panel-ready fridges that take cabinet fronts are the ultimate modern disguise.

11. Use a Soapstone Countertop for an Authentic Rustic Patina

Pin this soapstone countertop inspiration to your “Natural Stone” board!
Soapstone is the ultimate rustic material for countertops. Its dark, soft surface develops a natural patina over time—scratching and oiling only make it better looking. It’s heat-resistant, non-porous, and brings an earthy soul that granite or quartz never can.
Materials Needed
- Soapstone countertop (custom-cut by fabricator) – 3/4” or 1-1/4” thick
- Mineral oil (food-grade) for initial seal
- Fine-grit sandpaper (220) for scratch repair
- Caulk matching stone color
Care & Installation Steps
- Have a professional fabricator cut and install soapstone slabs (it’s heavy and requires precision).
- After installation, apply a thin coat of food-grade mineral oil using a soft cloth. Let absorb 24 hrs.
- Wipe off excess oil. Repeat 2–3 times over the first week.
- For daily care: clean with mild soap and water. Avoid acidic cleaners.
- To refresh patina: re-oil once a month initially, then every 3–6 months after patina develops.
Pro-Tip: Many homeowners worry about scratches on soapstone, but they actually build the desired patina. Light scratches can be sanded out with 220-grit sandpaper and re-oiled—the surface stays smooth and rich.

12. Style Open Shelving with Unfussy Linens and Antique Accents

Pin this styling inspiration to your “Open Shelf Styling” board!
Open shelves are only as good as what’s on them. The secret to the modern rustic look is unfussy linens, white ceramics, and a few antique accents—think stonewashed napkins, vintage tins, and a trailing plant. Keep it simple, textured, and intentional.
What You Need
- Open shelves (reclaimed wood or floating) already installed
- Styling items: folded linen napkins, ceramic pitchers, vintage tins, small live or dried plants
- Decorative accents: antique scales, wooden cutting boards, cookbooks
Styling Steps
- Start with a base – lay down a wooden cutting board or a stack of cookbooks horizontally.
- Add vertical items – place a ceramic pitcher or tall jar next to the base.
- Layer texture – fold linen napkins and stack them on a small plate; add a trailing plant cascading over the shelf edge.
- Include vintage accents – tuck in an antique milk can or a small sign. Limit to 2–3 accent pieces per shelf.
- Edit ruthlessly – remove any item that clutters. Leave 30–40% negative space per shelf.
Pro-Tip: Use white and cream ceramics almost exclusively – color comes from the wood shelf and greenery, not from bright dishware. This keeps the look cohesive and allows the unfussy linens to shine.

13. Anchor the Space with a Rustic Wood Dining Table

Pin this dining table to your “Farmhouse Dining” board!
A large reclaimed wood trestle table grounds the entire kitchen. It’s where family gathers and where the rustic heart of the room beats strongest. Pair it with black metal chairs to echo the industrial-modern accents from the island, and dress it with a simple linen runner.
Materials Needed
- Reclaimed wood trestle table (6–8 ft long, 36–42” wide)
- Black metal chairs (crossback or industrial style)
- Floor protectors (felt pads for legs)
- Linen table runner, simple centerpiece (mason jar with wildflowers)
Styling & Setup Steps
- Position table in the kitchen’s dining or breakfast nook, leaving 36” clearance on all sides for chairs.
- Arrange chairs evenly around table (2 on each long side, 1 on each end for a 6-person table).
- Lay a linen runner down the center.
- Place centerpiece: a low cluster of wildflowers in a mason jar or a wooden bowl of fruit.
- Add placemats or chargers for practical everyday use.
Pro-Tip: If your table is 8 feet or longer, consider using a bench on one side for a more casual farmhouse feel. Benches also seat more people for holiday gatherings.

Key Takeaways: Your Quick Guide to a Modern Rustic Farmhouse Kitchen
Key Takeaways:
- Balance dark and light elements: Pair dark wood beams or butcher block with white shaker cabinets and bright subway tile to prevent the space from feeling heavy or cold.
- Prioritize matte black hardware for cohesion: Use the same matte black finish on cabinet pulls, island pendants, sink faucet, and bar stools to tie the modern and rustic elements together visually.
- Choose authentic materials where it counts: Invest in genuine reclaimed wood or soapstone for key focal points (beams, island top, dining table) to achieve the patina and texture that faux materials cannot replicate.
- Mix modern appliances with vintage lighting: A state-of-the-art stainless steel range looks intentional next to a milk glass pendant, proving the blend is curated, not accidental.
- Don’t overlook functional surfaces: Wide plank floors and butcher block counters add warmth but require proper sealing and maintenance—plan for regular oiling and occasional sanding.
- Limit open shelving to curated displays: Style with 60–70% items (linens, ceramics, plants) and leave negative space to avoid visual clutter. Store daily-use items in lower cabinets.
- Anchor the eating area with a large rustic table: A reclaimed wood trestle table provides the rustic anchor; pair it with black metal chairs to echo the modern accents from the kitchen island.
People Also Ask About Modern Rustic Farmhouse Kitchens
What is a modern rustic farmhouse kitchen?
A modern rustic farmhouse kitchen intentionally blends clean-lined, contemporary cabinetry and appliances with raw, natural materials like reclaimed wood, stone, and wrought iron. The result is a space that feels both fresh and lived-in, combining the warmth of traditional farmhouse style with the uncluttered simplicity of modern design. Key features include white or neutral cabinets, exposed wood beams, apron sinks, and matte black hardware.
What is the difference between modern farmhouse and rustic farmhouse?
Modern farmhouse emphasizes clean lines, neutral palettes (often all white), and sleek finishes like stainless steel and quartz, with minimal ornamentation. Rustic farmhouse leans heavily into distressed wood, rough textures, exposed stone, and visibly aged materials. The modern rustic farmhouse hybrid sits in the middle—using rustic textures (beams, butcher block) as accent layers within a predominantly modern, airy shell.
Is rustic farmhouse going out of style?
Rustic farmhouse as a maximalist trend (all barn wood, shiplap every wall, excessive signs) is fading, but the core principles of natural materials and warmth remain timeless. The modern rustic farmhouse style updates those elements with sleeker proportions, less clutter, and better lighting. As long as you balance rustic with modern—rather than going full cabin—your kitchen will stay stylish for years.
How to decorate a modern rustic farmhouse kitchen?
Start with a neutral base: white or light gray cabinets, a white subway tile backsplash, and light wood floors. Then layer rustic textures through furniture and accents: a reclaimed wood island top, exposed beams, open shelving with linen napkins, and antique-style light fixtures. Keep accessories minimal and functional—think ceramic pitchers, wooden cutting boards, and live plants—to maintain the modern side of the balance.
What colors are used in modern rustic farmhouse kitchens?
The palette is warm and neutral: whites (pure, cream), warm grays, and beiges for walls and cabinets, with browns (from natural wood) and matte black for accents and hardware. Occasionally, muted sage green or dusty blue appears on an island or in vintage tile. The goal is a serene, earthy backdrop where wood grain and metal finishes provide the color contrast.
What are the best countertops for a rustic farmhouse kitchen?
Butcher block and soapstone are the most authentic choices. Butcher block offers warmth and a natural surface for food prep, while soapstone develops a rich, dark patina over time and resists heat and stains. For a lower-maintenance option, a matte finish quartz in a warm cream or light gray can work if paired with enough visible wood elsewhere.
Can you mix modern appliances with rustic decor?
Yes—this is the defining move of modern rustic design. Modern stainless steel or black stainless appliances actually highlight the rustic elements by contrasting with them. The key is to choose appliances with simple, unadorned fronts (no fake handles or retro curves) and let the rustic features like wood beams and farmhouse sink be the visual stars.
How to add warmth to a modern farmhouse kitchen?
Add warmth primarily through wood: exposed ceiling beams, a butcher block island, wide plank floors, and floating shelves. Then layer in soft textures like linen curtains, woven baskets, and a wool rug under the dining table. Lighting color temperature matters—use 2700–3000K bulbs in your pendants and under-cabinet lights to cast a cozy, honey-toned glow rather than a harsh blue-white.
What flooring is best for rustic farmhouse kitchens?
Wide-plank engineered hardwood in a warm, medium brown tone is the top choice. It provides the authentic wood look with better moisture resistance than solid hardwood. For durability with rustic style, luxury vinyl plank in a hand-scraped wood texture is an excellent budget-friendly alternative. Avoid tile that looks too polished or glossy—it reads as purely modern.
Is modern rustic farmhouse expensive?
The style can be budget-friendly if you prioritize investment in a few key pieces (like a reclaimed wood table or a quality faucet) and DIY the rest (painting cabinets, installing shelves, swapping hardware). The most costly items are real wood beams (or custom faux), soapstone countertops, and professional installation of wide plank floors. However, the overall look is achievable at any price point by using mix-and-match finishes.
Final Thoughts on Your Modern Rustic Farmhouse Kitchen
Creating a modern rustic farmhouse kitchen isn’t about copying a single look—it’s about curating a space that feels both current and soulful. The 13 ideas we’ve explored give you a toolbox: from the architectural anchor of exposed wood beams to the subtle sophistication of matte black hardware, each element plays a role in the balancing act.
Start with the one or two changes that excite you most. Maybe it’s swapping out those shiny brass pulls for matte black, or finally installing that reclaimed wood shelf you’ve been eyeing. Small shifts in texture and color can dramatically alter the room’s feeling.
Remember, the best rustic kitchens tell a story—your story. The patina on the soapstone, the grain of the butcher block, the worn-in charm of a vintage milk can—these aren’t just decorations; they’re the quiet evidence of a home lived in. Trust the process, choose authentically, and let the warmth follow. Which of these 13 ideas will you try first? Share your plans in the comments below—we’d love to see your vision come to life.
Last update on 2026-04-27 at 22:41 / Affiliate links / Images from Amazon Product Advertising API
