
As an Amazon Associate KitchenwareSets.com earns from qualifying purchases.
How to Decorate With Antique Plates in the Kitchen: Complete Wall Decor Guide for Vintage Lovers
How do you decorate with antique plates in the kitchen without turning your beloved collection into a dusty hazard? It’s a common dilemma—you love the charm of vintage china but worry about damaging your treasures or your walls. Antique plates add timeless charm to kitchen walls when hung securely using proper plate hangers and clever arrangements. Start with a small collection, choose complementary patterns, and plan a layout on paper before committing. Use adhesive hooks or wire hangers designed for china to prevent damage to both your plates and your kitchen walls. Drawing from comprehensive analysis of current design trends and proven hanging methodologies, this complete guide will walk you through every step. You’ll discover how to source, secure, and style antique plates in a way that transforms your space and protects your investment.
Contents
show
Your Complete Guide to Creating a Stunning Vintage Plate Wall in the Kitchen – 9 Easy Steps
1. Curate Your Plate Collection: Finding Antique Plates That Tell a Story

Pin this collection inspiration to your ‘Kitchen Decor Ideas’ board!
The foundation of any great plate wall is a well-curated collection. You don’t need to spend a fortune or acquire museum-quality pieces. The goal is to find plates that speak to you and share a common thread—whether that’s a color palette, an era, or a pattern style. This is where your personal story begins.
What You Need (Sourcing Checklist)
- Sources: local thrift stores, estate sales, flea markets, online platforms (eBay, Etsy, Chairish)
- Key evaluation criteria: check for cracks, chips, crazing, and maker’s marks. Use a flashlight to inspect.
- Recommended pattern themes: blue-and-white transferware, floral porcelain, ironstone, or gold-rimmed china. Start with a unifying color or era.
- Budget tip: “Mix genuine antique plates with vintage reproductions to fill gaps without breaking the bank.”
How to Curate in 4 Steps
- Set a budget and a target number (6-9 plates for a starter wall).
- Visit thrift stores and estate sales regularly; look for separate saucers or smaller plates.
- Use online marketplaces with keywords like “vintage floral plate” or “antique transferware dinner plate” and filter by condition.
- Clean each plate gently with mild soap and water immediately after purchase to remove grime so you can truly assess the pattern and color.
Pro-Tip: I’ve found that plates with a diameter between 7 and 10 inches work best for a cohesive wall arrangement. Mix in a few smaller saucers and one large platter for visual rhythm.

2. Choose the Right Plate Hangers: Secure Your Treasures Safely

Save this hardware guide for your next plate wall project!
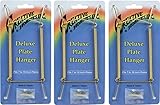
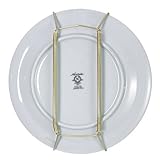
The right hanger is the unsung hero of any antique plates kitchen decor project. Choosing incorrectly can lead to scratched glaze, bent rims, or worse—a shattered plate. Understanding the differences between the main types will ensure your vintage treasures stay safe and stunning.
Supplies Needed
- Spring wire hangers with felt or rubber pads (for plates with raised rims)
- Adhesive plate hangers (for flat-backed plates or saucers)
- Measuring tape and level
- Pencil and paper for layout
Compare and Choose in 3 Steps
- For plates with a distinct rim (most antique china), choose spring wire hangers – they grip the rim securely. Ensure the wire diameter matches the plate’s weight (heavier plates need thicker wire).
- For flat plates or plates without a rim (e.g., many modern reproductions), use adhesive hangers with strong VHB tape. Clean the plate back thoroughly with rubbing alcohol before applying.
- Never use standard command hooks for valuable antiques – the stress point can crack the porcelain. Opt for felt-backed hangers to prevent scratches.
Pro-Tip: Always buy two sizes of hangers – small for saucers (6-7 inch) and large for dinner plates (10+ inch). A mismatched hanger can warp the plate edge over time.
3. Plan Your Layout: Design a Balanced Plate Arrangement

Pin this layout hack to your ‘Home Decor Tips’ board!
Before you reach for a drill, plan your arrangement on paper. This step saves you from unwanted holes and ensures a balanced, professional-looking display. The paper template method is foolproof and lets you experiment without commitment.
Materials Needed
- Craft paper or newspaper, scissors
- Pencil and tape
- Measuring tape and level
- Your assembled collection of antique plates (at least the ones you plan to hang)
Design Your Arrangement in 5 Steps
- Lay each plate on craft paper, trace around it, and cut out the circle.
- Arrange the paper circles on your kitchen wall using painter’s tape. Experiment with clusters, rows, or a large oval.
- Follow the “odd number rule”: groups of 3, 5, or 7 feel most balanced. Start with the largest plate as the anchor.
- Keep 2-3 inches of space between plate edges for a cohesive look, or overlap them for a more casual, curated feel.
- Step back and take photos; adjust spacing until the composition feels right. Leave templates up for 24 hours to avoid impulsive decisions.
Pro-Tip: Hang your largest plate or platter slightly off-center in the group – it creates a more dynamic visual path for the eye than a perfect center alignment.

4. Prepare the Wall: Measuring, Marking, and Installing Hardware

Save this installation tip for your next DIY weekend!
This is where the actual work begins. Proper preparation ensures your plates stay put for years. Whether you have drywall, plaster, or tile, there is a secure method for mounting your kitchen wall decor antique plates.
Tools Required
- Tape measure, level, pencil
- Drill with appropriate bits (masonry bit for tile/plaster)
- Wall anchors (if not going into studs)
- Screwdriver
- Stud finder (optional but recommended)
Installation Steps (for one plate)
- Hold the chosen hanger at the back of the plate, mark where the top edge of the hanger sits. Use this mark to position your wall anchor.
- Use a stud finder if possible; if hitting a stud, you can screw directly. If not, drill a pilot hole and insert a toggle bolt or heavy-duty drywall anchor.
- Screw the hanger’s wall screw into the anchor, leaving about ¼ inch protruding.
- Check level, then hang the plate. Ensure the wire or disc is seated correctly and the plate doesn’t wobble.
- Repeat for all plates, using your paper templates as guides. Step back regularly to check overall layout.
Pro-Tip: For plates over 10 inches in diameter, always use two wall anchors spaced 4 inches apart for extra stability. A single anchor can fail under the lever force of a heavy plate.

5. Create a Stunning Gallery Wall: Mix Plates with Other Vintage Accents

Pin this gallery wall layout to your ‘Vintage Decor’ board!
Antique plates don’t have to exist in isolation. Integrating them into a larger gallery wall with other vintage plates kitchen ideas creates a rich, layered look that feels curated and personal. This approach allows you to incorporate various collectibles and artwork.
What You Need (Beyond Plates)
- Small vintage mirror (oval or round)
- Lightweight wooden or metal wall decor (e.g., vintage kitchen tools, mini framed butterfly print)
- Floating shelf or small bracket shelf
- Various sizes of antique plates (3-5 for this style)
How to Build the Eclectic Gallery Wall
- Choose a focal point – the largest plate or the mirror. Hang it first centered in the area.
- Build outward: add a plate to the right, slightly lower; add another to the left, higher. Keep edges 2-4 inches apart.
- Add the small wall decor items in between to fill negative space, ensuring they don’t crowd the plates.
- Install the shelf about 6 inches below the lowest plate and style it with a small vase, a stack of cloth napkins, or a vintage tin.
- Step back and adjust – the overall shape should be organic, not rigid. Remove one item if it feels cluttered.
Pro-Tip: Keep the weight balanced: if you have a heavy mirror on one side, offset it with a cluster of lighter saucers on the other. This prevents the wall from feeling lopsided.

6. Display Antique Plates on Open Shelving: A No-Drill Alternative

Save this shelf styling idea to your ‘Kitchen Inspiration’ board!
For renters or anyone wanting to avoid drilling holes, open shelving kitchen displays are a fantastic, flexible alternative. You can create an equally beautiful and impactul display without any wall damage.
Supplies Needed
- Existing open kitchen shelving or new floating shelves installed per manufacturer’s instructions
- Plate display stands (easels) or plate rails (thin wooden strips)
- Clear museum gel / wax (to secure plates if leaning)
- Vintage cookbooks or small crocks to prop plates against
How to Style Antique Plates on Shelves
- Select a shelf that doesn’t get greasy steam (avoid directly above stove). Ideal spots: beside a window, above a coffee station, or on a kitchen island shelf.
- For a casual look, lean a large plate against the back of the shelf, angled slightly. Place a smaller plate in front leaning on a cookbook.
- For a more structured display, use plate display stands (easels) – set each plate upright, varying the height and spacing.
- Alternate plates with other objects: a ceramic pitcher, a stack of plates, a small vase. This prevents a flat look.
- If you have a plate rail, slide plates into the groove – they stay secure without adhesive.
Pro-Tip: Avoid overloading the shelf – three plates per shelf is ideal for visual breathing room. Too many plates look like inventory, not decor.

7. Highlight a Single Statement Plate: Minimalist Approach

Pin this minimalist statement piece inspiration!
Sometimes, less is more. A single antique plate as art can make a powerful, sophisticated statement in a modern or minimalist kitchen. This approach draws the eye directly to the plate’s beauty and detail.
What You Need
- One large antique plate (10-14 inches) or a platter
- Appropriate heavy-duty wire hanger
- Wall that can act as a focal point (e.g., wall space above a small table, end of a counter, kitchen breakfast nook)
How to Create the Single-Statement Display
- Select a plate with high visual impact: a complex pattern, vivid colors, or interesting shape (e.g., oval platter).
- Choose a hanging method that matches the plate weight – for heavy platters, use two screw eyes and wire, or a spring hanger rated for over 5 lbs.
- Position it at eye level (around 57-60 inches from floor to center of plate).
- Keep the surrounding area minimal – no other wall decor within 2-3 feet. Let the plate breathe.
- Style a small vignette below: a simple vase, a stack of books, or a single candlestick.
Pro-Tip: If your statement plate has a chip or hairline crack, display it anyway – the imperfection adds to its story and authenticity. I always choose plates with visible wear for single display.
8. Incorporate Plates into a Kitchen Backsplash: A Creative Accent

Save this backsplash accent idea to your ‘Kitchen Details’ board!
The backsplash is an often-overlooked canvas for kitchen backsplash decor. Adding a couple of small, lightweight plates can break up the tile and infuse the area with character. This works especially well with a classic tile like subway or hexagon.
Supplies Needed
- Lightweight antique saucers or small plates (under 1 lb each)
- Adhesive plate hangers designed for tile (with high-tack gel or suction cup)
- Rubbing alcohol and lint-free cloth
- Ruler and pencil
How to Mount Plates on a Tile Backsplash
- Clean the tile area with rubbing alcohol to remove any grease or residue. Let dry completely.
- Mark the desired position lightly with pencil on the tile (pencil will wash off later).
- Apply the adhesive hanger according to manufacturer instructions – press firmly for 30 seconds.
- Wait 24 hours for the adhesive to fully bond before hanging the plate.
- Hang the plate and double-check it’s level. Enjoy your unique backsplash accent without permanent wall damage.
Pro-Tip: Use a clear adhesive hanger that matches your tile color – they become almost invisible. Avoid dark hangers on white tile – they draw attention away from the plate.

9. Maintain and Refresh Your Plate Display: Long-Term Care Tips

Pin this care routine to your ‘Antique Plate Care’ board!
To keep your display looking its best for years, a small amount of regular maintenance is essential. The kitchen environment—with its heat, moisture, and grease—requires a specific care approach for maintaining antique plates kitchen displays.
Supplies Needed
- Soft microfiber cloth or feather duster
- Mild dish soap and water in a spray bottle (for deeper clean)
- Soft sponge (never abrasive)
- Museum gel or putty (for resticking leaning plates)
Maintenance Routine (Monthly)
- Weekly: Use a feather duster or a soft, dry microfiber cloth to gently remove surface dust from each plate. Pay attention to the edge of the plate where dust settles.
- Monthly: If the kitchen gets greasy (near stove), lightly spray a cloth with mild soapy water and wipe the plate’s front. Never soak or spray directly onto the plate – moisture can seep into hanger pads.
- Seasonal: Check hanger security – gently tug to ensure no loosening. Also check for signs of rust on wire hangers; replace if spotted immediately to avoid staining the plate.
- Annual: Consider rotating the display – move plates to different walls to even out sun exposure. This also freshens the look of your kitchen decor.
Pro-Tip: For truly fragile plates (crazing or hairline cracks), dust only with a dry, ultra-soft makeup brush. Never use liquid cleaners – they can penetrate and discolor the glaze.

Key Takeaways: Your Quick Guide to How to Decorate With Antique Plates in the Kitchen
Key Takeaways:
- Curate a collection with intention – mix sizes and patterns but stick to a unifying color or era (e.g., blue-and-white transferware). Source from thrift stores, estate sales, and online auctions to build variety.
- Choose the right hangers for safety – wire spring hangers with felt pads for rimmed plates, adhesive hangers for flat plates. Heavy pieces require two anchors to prevent falls.
- Plan your layout on paper first – trace plates onto craft paper, cut out templates, and tape them to the wall. This allows you to adjust spacing and alignment without damaging the wall.
- Use proper wall anchors – for drywall, toggle bolts or heavy-duty anchors rated for at least 5 lbs. For plaster, use expansion anchors. Studs are ideal but not essential if anchors are used correctly.
- Consider no-drill alternatives – open shelving with plate stands or leaning plates against cookbooks is damage-free and perfect for renters.
- Create visual variety – single statement plates work as minimalist art; gallery walls mixing plates with mirrors and shelves add depth.
- Maintain gently – dust weekly with a soft cloth; avoid moisture near hangers; rotate displays seasonally to prevent sun fading and keep your kitchen decor fresh.
People Also Ask About How to Decorate with Antique Plates in the Kitchen
How do you hang antique plates on a wall without damaging them?
Use spring wire plate hangers with felt or rubber pads that grip the rim of the plate without scratching the glaze. Install a wall anchor appropriate for your wall type (drywall or plaster) and screw the hanger’s eye into the anchor. Never use suction cups or standard command strips alone, as they can fail unpredictably. For large or heavy plates, consider using an adhesive hanger designed for tile if you want a drill-free solution on hard surfaces.
What is the best way to display vintage plates in a kitchen?
The best way is to choose a wall location away from direct heat and grease, and plan a balanced arrangement using an odd number of plates (3, 5, or 7). Use paper templates to mock up the layout before drilling. Mix plate sizes and consider adding a small shelf or mirror for visual interest. Always secure plates with proper hangers to prevent falls.
Can I display plates on kitchen shelves instead of walls?
Yes, displaying antique plates on open kitchen shelves is a popular, renter-friendly alternative. You can lean plates against cookbooks or use plate display stands (easels) to keep them upright. Use museum gel or putty to secure the base so they don’t tip. This method works especially well for mixing plates with other vintage accessories like ceramic vases or stacks of linen.
What kind of plate hanger is safest for antique china?
The safest hanger is a spring wire hanger with a felt or rubber lining that gently grips the plate rim without marking the surface. For plates without a raised rim (flat-backed), use adhesive hangers with heavy-duty VHB tape. Always choose a hanger rated for the weight of your plate – most spring hangers handle up to 5 lbs, but heavy platters may require two-point wire hangers.
How do I arrange plates on a wall to create a cohesive look?
Start by laying out all your plates on the floor to see how they relate in size and color. Group by a theme (e.g., all blue-and-white) or by a common era. Arrange in a cluster, a row, or a circle. Use paper templates on the wall to test spacing – 2-3 inches between plates is typical. Step back and adjust until the composition feels balanced.
Can I hang antique plates on a plaster wall?
Yes, but you need the right anchor. Plaster walls require expansion anchors (molly bolts) that open behind the plaster for a secure hold. Standard drywall anchors can cause crumbling. Drill a pilot hole with a masonry bit, insert the expansion anchor, and then attach the hanger. Always test the hold by applying gentle pressure before hanging your valuable plate.
How do I protect antique plates from kitchen grease and dust?
Dust antique plates weekly with a soft microfiber cloth or a makeup brush for fragile pieces. Avoid placing plates directly behind or above a stove where they will be exposed to oil splatter. If grease gets on the plate, wipe gently with a damp, non-abrasive cloth and mild soap, then dry immediately. Never use spray cleaners directly on the plate – they can seep into hanger pads.
Where can I find affordable antique plates for kitchen decor?
Check local thrift stores, estate sales, and flea markets for the best deals – often under $5 per plate. Online platforms like eBay and Etsy offer curated vintage collections with keywords like “vintage floral plate” or “antique transferware dinner plate”. Also ask family members – many people have old china sets stored in attics that they’d be happy to part with.
What are common mistakes when hanging antique plates?
Common mistakes include using the wrong hanger size, drilling without checking for wall studs, hanging too close to the stove, and overcrowding the wall. Another frequent error is not leveling the hanger – a crooked plate draws the eye negatively. Always measure twice, use a level, and allow 2-3 inches of negative space between plates for a professional finish.
Is it safe to use adhesive hangers for antique plates?
Yes, if you choose high-quality adhesive hangers designed for the weight of the plate. Clean the plate back thoroughly with rubbing alcohol, allow to dry, apply the hanger, and wait 24 hours before hanging. Test the bond by gently tugging the plate after hanging. Avoid adhesive hangers for plates over 2 lbs or in high-humidity areas like above a dishwasher.
Final Thoughts on How to Decorate With Antique Plates in the Kitchen
Decorating with antique plates isn’t just about filling empty wall space – it’s about weaving history and personality into the heart of your home. Whether you choose a bold gallery wall with a dozen floral plates or a single statement platter above a coffee station, the key is to start with intention. Curate pieces that speak to you, plan your layout carefully, and hang them using the secure methods we’ve covered – your china will thank you.
Every crack, every pattern, every faded blue brushstroke tells a story. I’ve found that the most interesting plate walls are the ones that evolve over time – you discover a new saucer at a flea market, rearrange the layout, and suddenly the wall feels fresh again. Don’t be afraid to break the rules. Overlap plates, mix eras, and incorporate other vintage finds like mirrors or wooden spoons.
The best part? Antique plate decor is endlessly customizable and surprisingly budget-friendly. A $3 thrift store plate can become the focal point of your entire kitchen. So go ahead – start scouting those sales, grab a pack of paper templates, and make a date with your drill. Your kitchen is about to get a whole lot more charming.
Now I’d love to hear from you: What’s the most cherished antique plate in your collection, and where did you find it? Drop a comment below – I’m always looking for new thrift stories!
Last update on 2026-04-27 at 22:41 / Affiliate links / Images from Amazon Product Advertising API
