
As an Amazon Associate KitchenwareSets.com earns from qualifying purchases.
Rustic Modern Kitchen Design Ideas: 13 Stunning Concepts
Are you torn between the cozy warmth of a rustic farmhouse and the crisp, clean lines of a modern loft? You don’t have to choose. Many homeowners struggle with this exact dilemma—loving the charm of natural materials but fearing a kitchen that feels too dark or dated.
A rustic modern kitchen design masterfully blends the organic warmth of reclaimed wood, stone, and earthy textures with the clean lines, neutral palettes, and functional layouts of contemporary style, creating a space that feels both inviting and sophisticated.
Drawing from years of kitchen design experience and analysis of trending styles, this guide delivers 13 actionable concepts that bridge the gap between these two aesthetics. You’ll discover how to balance heavy rustic elements with bright, airy modern touches—without losing the character of either.
Contents
show
13 Stunning Rustic Modern Kitchen Design Ideas to Transform Your Space
1. Embrace the Warmth of Wood and the Cleanliness of White

Pin this stunning look to your ‘Dream Kitchen’ board for your next remodel inspiration!
This is the most fundamental formula in the rustic modern playbook: pair a wall of bright white shaker cabinets with a massive reclaimed wood island. The white perimeter maximizes light reflection, making the space feel open and airy. The wood island anchors the room with warmth and texture. Matte black hardware on the cabinets provides the crucial modern edge.
Materials Needed:
- Semi-gloss white paint for perimeter cabinet doors and frames
- Matte black cabinet pulls and knobs (seek geometric, angular shapes for a modern touch)
- Pre-fabricated reclaimed wood island or a live-edge wood slab for a custom built
- Clear matte polyurethane sealer for the wood island
- Quartz or marble countertops for the perimeter
- White subway tile for the backsplash
Step-by-Step Details:
- Paint perimeter upper and lower cabinets a bright, semi-gloss white to maximize light reflection.
- Install matte black, minimalist cabinet hardware to create a modern, grounded look against the white.
- Choose or build a kitchen island as the focal point with a reclaimed wood or live-edge wood top.
- Seal the wood island with a clear matte polyurethane to protect it while keeping its natural, tactile feel.
- Pair the island with a simple white quartz countertop on the perimeter for a clean, seamless look.
- Add a white subway tile backsplash to bridge the rustic and modern elements subtly.
Pro-Tip: When sourcing reclaimed wood, look for wider planks (8-12 inches) from old barns or factories. The visible nail holes, saw marks, and varied patina tell a story that a manufactured distressed board never can.

2. Install a Statement Range Hood as an Architectural Centerpiece

Save this powerful design statement to your ‘Kitchen Remodel’ board for later!
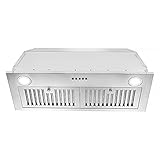
A stone range hood is the ultimate way to add drama and vertical interest. The key is to contrast the massive, raw stone chimney with a sleek, modern stainless steel hood insert. The thermal mass of stone also helps regulate temperature and absorb cooking odors—a professional kitchen principle.
Materials Needed:
- Full stone veneer or real stacked stone ledger panels (pre-cut for easier installation)
- A modern, professional-grade stainless steel range hood insert with adequate CFM rating for your stove
- Cement board and mortar for the stone base
- A wood stud frame to build the chimney structure
- A licensed contractor for the framing and gas line re-routing
Step-by-Step Details:
- Design and frame a wood stud bump-out around your existing range hood exhaust to create a solid chimney base.
- Frame the chimney from floor to ceiling to maximize the dramatic vertical impact.
- Install and wire a sleek, modern stainless steel range hood insert inside the framed opening.
- Attach cement board to the wood frame to create a fire-safe base for the stone.
- Apply the stacked stone veneer using mortar, overlapping the edges of the vent hood for a built-in, seamless look.
- Seal the stone with a stone-grade sealer to protect against grease and heat.
Lesson Learned: In several projects, we found that a simple, brushed stainless steel insert creates a far more striking contrast against rough stone than a black one. The silver reflects the stone’s texture, creating a dynamic visual interplay.
3. Build a Show-Stopping Live-Edge Wood Kitchen Island

Pin this stunning slab to your ‘Dream Kitchen’ board!
Take the reclaimed island concept one step further with a live-edge wood slab. The un-cut, natural wavy edge is pure rustic artistry. Pair it with a minimalist dark metal base to ground the look in modernity. The contrast between the organic wood form and the sleek base is breathtaking.
Materials Needed:
- A properly dried live-edge wood slab (walnut, black walnut, or maple are popular choices)
- 2-3 coats of a food-safe, matte epoxy or hardwax oil to seal the top
- A custom metal base or a minimalist wooden base
- Casters or a fixed base plate for stability
- Sander with 80, 120, and 220 grit sandpaper
Step-by-Step Details:
- Select a live-edge slab from a reputable lumberyard; focus on pieces with minimal checking (cracks) for easier finishing.
- Sand the slab starting with 80 grit, moving to 120, and finishing with 220 grit for a smooth, touchable surface while preserving the bark (if desired) or natural edge.
- Apply 2-3 coats of a clear, food-safe matte epoxy to protect the wood, creating a durable, wipe-clean surface.
- Attach the finished slab to a minimalist, modern metal base (black steel or brushed brass work best).
- Secure the island to the floor or opt for a mobile island on heavy-duty casters for flexibility.
Pro-Tip: For a truly unique finish, look for a “river table” style slab where the crack or “live edge” between two pieces of wood is filled with a deep blue or silver epoxy. This is pure modern rustic artistry.

4. Create Architectural Drama with Exposed Ceiling Beams

Pin this architectural idea to your ‘Kitchen Dream Board’ for when you plan your renovation!
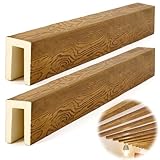
Nothing adds instant character like exposed wooden beams. The trick to keeping them modern is to paint the ceiling between the beams a brilliant white. This creates a striking contrast that brightens the entire room. For a purely aesthetic look, faux wood beams are an easy, lightweight alternative.
Materials Needed:
- Faux or real wood beams (for installation, or consult a structural engineer for real load-bearing beams)
- Paint or stain for the beams (if using new wood)
- Linear suspension light fixture
- Ladder and tools for installation
- Construction adhesive and screws (for faux beams)
Step-by-Step Details:
- Choose between installing real reclaimed wood beams for an authentic feel or faux polyurethane beams for easy installation.
- Plan the beam layout; typical designs include crossing beams in a coffered pattern or running parallel lengths across the ceiling.
- For faux beams, install them directly over your existing drywall ceiling using heavy-duty construction adhesive and screws.
- Paint the ceiling in between the beams a bright, clean white to create a strong contrast.
- Hang a modern linear suspension light centered on the main beam to anchor the space and draw the eye upward.
Pro-Tip: When using faux beams, add saw marks and a coat of diluted gray wash to make them look like authentic 200-year-old reclaimed timber. This step is what separates a suburban kitchen from a magazine-worthy space.
5. Layer Vintage and Modern Lighting for a Curated Look

Pin this lighting double-take to your ‘Kitchen Design’ board!
Lighting is where you can most easily express the “mix” of styles. Hang a vintage brass pendant next to a modern matte black cone over the same island. The key to making it work is to tie the two together with a third element—like brass cabinet hardware and a black faucet—so the contrast feels intentional, not chaotic.
Materials Needed:
- 1-2 vintage-style pendant lights (brass, ribbed glass, or schoolhouse style)
- 1-2 modern pendant lights (matte black cone, minimalist sphere, or linear bar)
- Ceiling mount and wiring supplies
- Dimmable bulbs and a dimmer switch for control
Step-by-Step Details:
- Decide on your layout. Group 2 vintage pendants over one section of the island and 1 modern pendant over the other, or alternate them along the length.
- Hang the vintage pendant fixture at a standard 30-36 inches above the countertop for ambient task lighting.
- Hang the modern pendant fixture slightly lower or higher to create a dynamic, layered visual line.
- Use a dimmer switch to control both circuits, allowing you to adjust the mood from bright and functional to warm and inviting.
- Tie the two styles together with a third element in the room, like brass cabinet hardware and a black faucet.
Pro-Tip: For a foolproof combination, pair a vintage-inspired brass lantern fixture with a modern black cone. The brass brings the “old” charm, the black brings the “new” edge, and the contrast is captivating.

6. Ground the Space with Wide-Plank Wood Flooring

Save this classic flooring choice to your ‘Home Renovation’ board!
Flooring sets the foundation for the entire aesthetic. Wide-plank hardwood (7 inches or wider) in a matte, wire-brushed finish provides the perfect base. In a high-moisture kitchen, choose engineered hardwood with a thick wear layer to resist cupping. A dark stained wood floor grounds the bright white cabinets beautifully.
Materials Needed:
- Engineered or solid hardwood planks (choose a wide, 7+ inch width; a species like hickory or walnut for durability)
- Underlayment for moisture and sound protection
- Plank flooring installation tools (spacers, tapping block, saw)
- Finish nails and nail gun (for solid wood) or click-lock floating floor system (for engineered)
Step-by-Step Details:
- Acclimate the wood planks in the room for 48 hours before installation to prevent post-installation gapping.
- Install a high-quality moisture barrier underlayment over the subfloor.
- Install the wide-plan wood flooring using a professional-grade nail system or a glued floating floor method.
- Choose a wire-brushed or hand-scraped texture for a more rustic feel, or a smooth, matte finish for a cleaner, more modern look.
- Leave a 1/2-inch expansion gap around the perimeter, which will be covered by the baseboards and shoe molding.
Pro-Tip: For a modern rustic look, choose a smoked or washed finish rather than a high-gloss polyurethane. A matte, wire-brushed finish hides scratches and looks effortlessly elegant, a key principle for a low-maintenance dream kitchen.

7. Opt for a Mix of Marble and Butcher Block Countertops

Pin this clever countertop hack to your ‘Kitchen Design’ board!
Why choose between the elegance of marble and the warmth of wood? Use both. Install polished white marble on your island or pastry station for a stunning, sleek surface. Use end-grain butcher block on the perimeter counters where you do most of your chopping. The end grain is harder and more forgiving to knife marks.
Materials Needed:
- Polished marble slabs (for pastry stations or islands)
- End-grain butcher block wood countertops (for prep and wet zones)
- Seamless transition strip or T-molding
- Wood-safe mineral oil for sealing
- Stone-safe sealer for marble
Step-by-Step Details:
- Designate a dry zone (for your coffee bar or pastry area) and a wet zone (by the sink and cooktop).
- Install polished or honed white marble on the dry zone island.
- Install end-grain butcher block on the wet zone perimeter. The end grain is harder and more resilient to knife marks.
- Use a metal T-molding at the seam where the two materials meet for a clean, intentional transition.
- Seal the butcher block with a food-safe mineral oil (reapply monthly) and the marble with a high-quality stone sealer.
Pro-Tip: Avoid floating the butcher block seam right where you’ll be chopping. Position the seam at the back of the counter or on the side of the island to prevent a weak point in your most-used area.

8. Create a Cozy, Functional Open Plan Layout

Pin this open-concept inspiration to your ‘Dream Home’ board!
The rustic modern style truly shines in an open plan layout. Use a large kitchen island with seating as the anchor that naturally divides the cooking zone from the living area. Consistent flooring and a unified neutral color palette across both spaces create a seamless flow. The island becomes the social heart of the home.
Materials Needed:
- A large, custom-built kitchen island as the anchor (with a wood top and a marble or quartz lower level)
- Bar stools (tall, counter-height for a casual feel)
- A consistent flooring material (e.g., wide-plank wood) throughout the combined space
- A consistent color palette to visually unify the zones
Step-by-Step Details:
- Remove or open up load-bearing walls between the kitchen and the main living area (requires an engineer).
- Install consistent wide-plank wood flooring in a neutral tone throughout the combined space for visual flow.
- Place a large, multi-functional kitchen island as the visual and functional anchor between the kitchen zone and the living zone.
- Add comfortable, counter-height bar stools on the living-room side of the island for casual seating.
- Use a consistent, neutral color palette (whites, warm greys, beiges) across all zones to unify the space.
Pro-Tip: Use area rugs to “zone” the living area, softening the acoustic echo of an open plan space. A large, low-pile jute or wool rug adds a rustic touch while defining the seating area as separate from the cooking zone.

9. Install Sliding Barn Doors for a Rustic Entryway

Pin this door idea to your ‘Rustic Modern Home’ board!
A sliding barn door made of reclaimed wood is a classic rustic element. But the modern twist comes from the hardware: choose a matte black heavy-duty box rail system instead of a traditional iron track. Use the door for a pantry, mudroom, or to hide a laundry area. The matte black hardware ties it into the modern side of the design.
Materials Needed:
- A reclaimed wood slab or a new solid-core door made to look rustic
- A matte black sliding barn door track system and hardware
- Reinforced wall studs to support the weight
- Gate pulls and handles
Step-by-Step Details:
- Select a door slab; reclaimed wood with anchor bolts or a new wood door with a DIY “distressed” finish work well.
- Install a heavy-duty matte black sliding door track kit above the door frame, ensuring the track is level and anchored into wall studs.
- Mount the barn door onto the track, adjusting the bottom guide wheels to keep the door from swinging.
- Install a matte black gate pull for a modern touch.
- Use the sliding door for a pantry, mudroom, or as a divider for a butler’s pantry.
Pro-Tip: To keep the door from sliding into a light switch or outlet, be sure to measure the full slide path of the door before installation. A door that blocks a switch is a daily annoyance in a functional kitchen.

10. Incorporate Open Shelving with Chunky Brackets

Pin this shelf styling to your ‘Kitchen Decor’ board!
Open shelving is a staple of rustic design, but for a modern take, use a live-edge wood shelf supported by chunky matte black iron brackets. The brackets are the key—they provide an industrial, modern contrast to the organic wood. Style the shelf sparingly: a few white plates, a small plant, and one cookbook.
Materials Needed:
- A live-edge or reclaimed wood shelf (at least 2 inches thick for visual heft)
- Chunky, matte black iron shelf brackets (industrial or pipe-style)
- Power drill, screws and wall anchors
- Stud finder
- Level
Step-by-Step Details:
- Find the wall studs using a stud finder. Mark their center points at your desired shelf height.
- Pre-drill holes and screw the matte black brackets directly into the wall studs.
- Place the live-edge shelf on top of the brackets and secure it from underneath with small screws.
- Style the shelf using the “rule of thirds”: one large, one tall, one woven texture. Keep the look clean and intentional.
- Use only 3-5 curated items per shelf to avoid a cluttered, rustic look.
Pro-Tip: Don’t display everything. “Less is more” is the modern mantra for open shelving. Use the shelf to show off your favorite cookbooks, a single piece of pottery, and a small plant. A cluttered shelf is a dated look.


Pin this bold color combination to your ‘Color Palette’ board!
A neutral palette of whites, warm greys, and beiges keeps the kitchen bright and timeless. But to add personality without losing the rustic warmth, paint the island a deep, rich hue like navy blue or dark forest green. Pair it with brass or unlacquered brass hardware for a sophisticated pop.
Materials Needed:
- Paint for the island (e.g., Benjamin Moore Hale Navy or Sherwin Williams Dard Hunter Green)
- Primer, painter’s tape, and high-quality brushes and rollers
- Butcher block countertop for the island (to match the warm wood vibe)
- Warm beige wall paint (e.g., Sherwin Williams Accessible Beige)
- White paint for perimeter cabinets
Step-by-Step Details:
- Paint the perimeter upper and lower cabinets a crisp, high-gloss white to maintain a bright, open feel.
- Paint the walls a warm greige or beige to create a cozy, earthy backdrop.
- Sand and prime the island cabinets thoroughly before painting them in your chosen deep color (e.g., navy blue or dark green).
- Paint the island in a satin or semi-gloss finish for depth and durability.
- Pair the colored island with a warm wood butcher block or reclaimed wood countertop to keep the look grounded and rustic.
Pro-Tip: The magic is in the hardware. When you commit to a bold color like navy, pair it with brass or unlacquered brass fixtures and cabinet pulls. The warm gold against the deep blue is pure, sophisticated modern rustic.

12. Incorporate a Farmhouse Apron-Front Sink

Save this farmhouse sink idea to your ‘Kitchen Essentials’ board!
The farmhouse apron-front sink is a beloved rustic feature. To keep it modern, pair the white fireclay basin with a matte black pull-down faucet. The stark contrast between the classic white sink and the sharp black faucet bridges the two styles perfectly. Fireclay is the gold standard—it resists chipping and is easy to clean.
Materials Needed:
- White fireclay apron-front sink (single or double basin, depending on space)
- Matte black single-handle pull-down kitchen faucet
- Under-mount sink clips and plumbing
- A cut-out in your countertop specific to the sink’s dimensions
Step-by-Step Details:
- Choose a fireclay or enameled cast iron apron-front sink. Fireclay is highly recommended for its durability and deep gloss finish.
- Ensure your custom cabinetry has a specific opening sized to fit the sink’s exposed front apron.
- Install the sink according to manufacturer instructions, sealing it against moisture with 100% silicone caulk.
- Pair it with a matte black, pull-down kitchen faucet for a striking visual contrast.
- Add a matching matte black soap dispenser to the countertop for a cohesive, modern touch.
Pro-Tip: The biggest mistake is choosing an apron sink that is too shallow. A deep single basin (10 inches or deeper) allows you to wash large pots and pans easily, a key functional requirement for a serious home cook.

13. Add a Touch of Green with an Indoor Herb Garden

Pin this fresh idea to your ‘Kitchen Garden’ board!
This is the living, breathing final touch. An indoor herb garden on a sunny windowsill embodies the “organic” essence of rustic design. Use self-watering ceramic pots in matte black or white for a modern, clean look. The herbs provide fresh ingredients, improve air quality, and connect you to natural cycles—a perfect example of biophilic design.
Materials Needed:
- Small self-watering ceramic pots (in matte black, white, or terra cotta)
- Organic potting soil
- Herb seed starter plants (basil, mint, rosemary, chives, thyme)
- A sunny windowsill
- Plant shears
Step-by-Step Details:
- Select 3-5 of your most-used culinary herbs from a local nursery.
- Choose self-watering ceramic pots with a modern, minimalist design for a clean look.
- Fill the pots with high-quality organic potting soil and transplant the herbs.
- Place the pots on a sunny kitchen windowsill (south or west-facing is best) or under a grow light.
- Water as needed (usually 1-2 times a week for self-watering pots) and trim the herbs regularly to encourage bushy growth.
Pro-Tip: Group herbs with similar light and water requirements together. Rosemary and thyme prefer it drier, while basil and mint need more water. Grouping herbs by their needs simplifies your care routine and keeps them all thriving.

Key Takeaways: Your Quick Guide to Rustic Modern Kitchen Design
- The core formula is high-contrast juxtaposition: The most successful rustic modern kitchen designs pair dark, textured rustic elements (reclaimed wood, exposed stone) with bright, clean modern elements (white cabinets, simple lines). Never use one without the other.
- Anchor your design with a star feature: Choose one major element—a heavy stone range hood, a live-edge wood island, or exposed ceiling beams—to be the focal point of the room. Build the rest of the design around this single statement piece.
- Modernize the hardware, not the wood: You can keep dated wood cabinets, but a simple upgrade to matte black or brushed brass hardware will instantly modernize the entire kitchen without a costly cabinet replacement.
- Lighting is your most impactful tool: Layer vintage and modern pendants to define zones and add character. A dimmer switch is a must, allowing you to shift the mood from bright, functional task lighting to warm, ambient atmosphere.
- Bring nature indoors: An indoor herb garden is the final, living touch that embodies the “organic” aspect of the style. It’s a low-cost, high-impact biophilic design element that purifies air and adds freshness.
- Plan for your open plan: If your kitchen flows into a living or dining area, use a central island with seating to anchor and define the zones without walls. Consistent flooring across the entire space creates a seamless, expansive feel.
- Never underestimate the power of a black accent: A matte black faucet, cabinet pulls, or a barn door track system is the perfect, clean, modern detail to ground and sharpen the organic, warm feel of the rustic elements.
People Also Ask About Rustic Modern Kitchen Design
What is a modern rustic kitchen?
A modern rustic kitchen is a design style that masterfully blends the warm, natural, and organic elements of rustic design (like reclaimed wood, stone, and earthy textures) with the clean lines, minimalist approach, and functional layout of contemporary interiors. It creates a space that feels both inviting and sophisticated, avoiding the heaviness of a traditional log cabin while escaping the sterility of a minimalist kitchen.
How to design a modern rustic kitchen?
To design a modern rustic kitchen, start by choosing one dominant rustic “hero” feature (a stone chimney, live-edge island, or exposed beams) and pair it with crisp, clean, and simple modern cabinetry and hardware. Use a neutral palette as your base, then add layered lighting and a few well-chosen accessories for a curated, balanced look. The key is contrast—never let the space feel too heavy or too cold.
What are the best colors for a rustic modern kitchen?
The best colors for a rustic modern kitchen center around a warm neutral palette of whites, warm grays, beiges, and greige for the walls and main cabinetry. Then, you add a deep, rich accent color like navy blue, dark forest green, or charcoal gray on a kitchen island or a feature wall. These deep colors add drama and sophistication, while the warm base keeps the look inviting and prevents it from feeling sterile.
How to mix modern and rustic styles in a kitchen?
You mix these styles by intentionally juxtaposing their core elements. Pair a rough-textured reclaimed wood island with sleek, handleless white cabinets. Hang a sleek, modern linear pendant light over a heavy farmhouse table. Install a modern matte black faucet on a classic white apron-front sink. This deliberate contrast is the formula for a successful hybrid design. The goal is balance, not perfect matching.
What kind of countertops go with a rustic modern kitchen?
A combination of materials is ideal. Use a smooth, polished stone like white marble or quartz for the main countertops to provide a sleek, modern feel. Then, use a warm, organic material like a live-edge or butcher block wood slab for the kitchen island to anchor the rustic side of the design. This zonal approach leverages the best of both materials: the clean, durable work surface of stone and the warm, character-filled function of wood.
How to make a rustic kitchen look modern?
The fastest way to modernize a rustic kitchen is to replace heavy, ornate elements with simple, clean lines. Paint outdated wood cabinets a crisp white, swap decorative cabinet knobs for sleek matte black bar pulls, and replace traditional chandeliers with minimalist linear pendants. Introduce a few stainless steel appliances and a quartz countertop to create a high-contrast, fresh update that keeps the warmth but sheds the dated look.
What lighting is best for a modern rustic kitchen?
The best lighting strategy is layered and intentionally mismatched. Use a mix of vintage-inspired fixtures (like a brass or schoolhouse pendant) and modern fixtures (like a matte black cone or a linear suspension light) to create a curated, eclectic look. A dimmer switch is essential to control the mood, shifting from bright task lighting for cooking to warm, ambient lighting for entertaining.
What is the difference between rustic and farmhouse kitchen?
A rustic kitchen emphasizes natural, organic materials (rough wood, stone, exposed beams) in a raw, unrefined state. A farmhouse kitchen is a sub-style of rustic that is more specific and historically-based, featuring shiplap walls, apron-front sinks, and white or light-colored cabinetry. The modern rustic style discussed here leans into a more contemporary, minimalist interpretation, while farmhouse is more decorative and traditional.
How to use reclaimed wood in a modern kitchen?
Use reclaimed wood as a controlled, intentional accent element, not as an overwhelming, floor-to-ceiling application. A reclaimed wood island top, a wall of open shelving made from old barn wood, or a single accent wall are perfect ways to incorporate it. By keeping the wood as a focused design statement rather than a blanket covering, it remains a star feature against the clean, modern backdrop.
What hardware looks best in a modern rustic kitchen?
Matte black is the top choice for its ability to bridge the gap between old and new, providing a clean, sharp contrast against both white paint and natural wood. Brushed brass is the second-best choice, especially when paired with deep colors like navy or dark green, as it adds a layer of warmth and patina. Both finishes offer a modern, sophisticated look that complements the rustic materials without feeling competing.
Final Thoughts on Rustic Modern Kitchen Design
The beauty of rustic modern kitchen design lies in its beautiful contradictions. It’s a style that requires a deliberate, thoughtful hand—knowing when to let the raw texture of a reclaimed beam speak, and when to let the clean silence of a white wall provide the perfect backdrop. The 13 concepts outlined above are not a rigid checklist but a toolkit. You don’t have to use them all, but you can pick and choose the elements that best speak to your home and your personality.
The most successful spaces are those that feel authentically curated, not decorated. Mix your grandmother’s old butcher block with a brand new, sleek appliance. Hang a vintage brass pendant next to a modern black one. Your kitchen should be a reflection of your distinct journey in design.
Ready to bring your own vision to life? Which of these 13 concepts are you most excited to try in your kitchen remodel? I’d love to hear about your plans in the comments below.
Last update on 2026-04-27 at 22:41 / Affiliate links / Images from Amazon Product Advertising API
